Showing posts with label Desserts. Show all posts

July 30, 2014

Summer Cobblers


I know we are on to picking blackberries right now and they are perfect for my favorite blackberry cobbler!  But, one day in the summer I got lucky enough to have picked cherries, strawberries, and my sister bought me some rhubarb from the farmers market and I made three summer cobblers! One cherry, one strawberry rhubarb, and one with all three!  Delish!! 

My mouth waters looking at these cherries!!!!
Summer Cobbler with all three fruits
Strawberry Rhubarb!  


Summer Cobbler Recipe

4 c. fruit
1 large egg
1 c. sugar
1 c. all-purpose flour
4 Tbsp. butter melted

For this recipe you can use an 8 inch square baking dish, or 6 - 7oz. ramekins.

1. Preheat oven to 375. Place fruit in a lightly greased dish
2. Stir together sugar and flour.  Whisk egg and melted butter and whisk together with sugar and flour.
3. Pour batter over fruit.
4. Bake for 40 minutes or until lightly browned and bubbly. Let stand 10 minutes. Serve with ice cream!!

I love summer so much!!!

July 27, 2014

Birthday Cake Milkshake


It doesn't even have to technically be your birthday to make this shake!!

I just figured while I'm on the roll of blogging seriously unhealthy foods, I might as well publish this post from early in June...

We had bought the Birthday Cake Oreos and decided to make a milk shake, and while looking at the ice cream selection at the grocery store I saw the Birthday Cake ice cream and knew it was meant to be.

My nephew was here visiting and as he drank his milkshake, he said something like, "I can feel myself getting diabetes."

If you like cake batter anything, you'll like this shake! 

Just added some milk and gave it a good twirl in the good ol' magic bullet.


Once again... You're welcome and I'm sorry. 

November 27, 2013

RE-POST - Mini Pumpkin Cheesecakes with Gingersnap Crust

I just decided that I'm making these again today! Delish!

These were yummy and simple to make!!!  No tricky cheesecake business here, and letting it cool in the oven, etc.  If you make your own cheesecake you know what I'm talking about. 

I didn't have a mini cheesecake pan like the person who originally posted this recipe, so I used my cupcake pan.  I had wanted to do my mini muffin pan, but I didn't have any liners for it (I had Christmas ones, and I wasn't going to take those to a Halloween party...), so I had to use the big muffin pan. 

It worked great - the cupcake liners basically peel off on their own.  I just had to shorten cook time.

The only change I will make to this recipe next time is to leave out the pecans in the crust and sub another graham cracker for them.  I like pecans, but I think this crust would be better with just using the gingersnaps and graham crackers. 

Don't mind the whipped cream that I overbeat (I did end up making more, so only four cheesecakes have smooth whipped cream... that's what happens when you have a 2 year old sous chef...

Mini Pumpkin Cheesecakes Recipe
Recipe from HERE
*** See serving size below

1 package (8 oz) Cream Cheese, room temperature (I used Neufchatel)
½ c. pumpkin puree
¼ c. + 2 tbsp. sugar
1 egg
2 tsp. heavy cream
¼ tsp. vanilla
¼ tsp. cinnamon
¼ tsp. pumpkin pie spice 
¹⁄₈ tsp. nutmeg

For the crust:
8 gingersnap cookies
1 graham cracker
**1½ tbsp. melted butter**
1½ tsp. brown sugar
¼ c. pecans
pinch of salt

** My gingersnaps were really big, and because gingersnaps really vary in size, you'll have to play it by ear how much butter you'll need - I ended up using 2 T of melted butter

For the whipped cream:
1 1/2 c. heavy cream
1 1/2 tbsp. granulated sugar
1 1/2 tsp. vanilla

Pumpkin pie spice for garnish

DIRECTIONS:

1. Preheat oven to 350 degrees. Fill muffin tins with liners.

2. In the bowl of a food processor, grind all ingredients for crust, except for the melted butter. The mixture should resemble slightly coarse crumbs. Remove mixture and pour melted butter over. Mix until crumbs are wet. Press into the bottom of each hole. Place in oven and bake for 5 minutes. (Just so you know, because the liners aren't full it will seem like they start burning... hence only the 5 minutes...)

3. While crust is baking prepare filling beating together cream cheese, sugar and pumpkin puree until smooth. Add spices, vanilla, heavy cream and egg.  Beat until combined.  (Always beat your cream cheese alone first before adding anything to it to help prevent lumps)

4. Pour filling over each crust, dividing evenly. Place in oven and bake for 10 minutes or until puffed and kind of firm. Remove from oven and cool in pan for 20 minutes before removing cheesecakes (yes your cheesecakes will sink a little, this is normal).

5. Refrigerate for 2 hours before serving.

6. While cheesecakes are cooling, prepare vanilla bean whipped cream by fitting a chilled mixing bowl into your stand mixer. Add heavy cream, sugar and vanilla. Using the whisk attachment beat on high for 2-3 minutes until stiff peaks begin to form. Return to refrigerator until cheesecakes are ready to be served.

7. To assemble, remove cheesecakes from muffin liners.  Then, using a mesh sieve, lightly dust cheesecakes with pumpkin pie spice before or after topping with a swirl of whipped cream.

8.  Enjoy!

****  I think the original serving size is for 12.  But, I wanted to make it stretch farter, and I made 18.  (That is what these pictures show)  I have made it again and doubled the recipe so the cupcakes were fuller (18).  You could really make 24 and be fine with the doubled recipe too. 

You can see how the wrappers just peel off by themselves practically.  Don't mind my really old cookie sheet that I use for purposes such as these...

October 22, 2013

Crepes with Chocolate Mousse


During my sister's pink birthday weekend, for breakfast one morning we had crepes.  Inspired by the gourmet crepes at the restaurant, Baker's Crust, we had loaded crepes with Nutella, chocolate mousse, strawberries, bananas, toasted coconut, toasted almonds, vanilla creme sauce, and whipping cream.

The chocolate mousse recipe is part of a dessert recipe I've been making for years, but I have no idea where I got it... maybe from Martha??  I mostly make white chocolate mousse (for desserts like THIS or THIS), but I've used all kinds of chocolate to make it.  For crepes I used milk chocolate.  I use it in a lot of things, it's pretty simple and delicious!! You can find the recipe for the crepes HERE

Chocolate Mousse Recipe

2 1/2 cups heavy cream
12 oz. milk chocolate (or any kind of chocolate)

1.  Prepare an ice water bath - Fill a large bowl 1/3 way full of cold water and ice.  Set aside
2.  Bring 1 cup of the cream just to a boil in saucepan (or I use a glass bowl and do it in the microwave sometimes)
3.  Place the chocolate in a food processor, with the machine running, pour in hot cream in a slow stream and process until smooth.  (I have actually not used the food processor...  You can just break up the chocolate in smaller pieces and pour the hot cream over and whisk until chocolate is all melted.)
4.  If using food processor, transfer chocolate and cream to a medium bowl.  (Another reason I stopped using the food processor, so I would only have one bowl to clean....)
5.  Set your bowl in the ice water bath.  Let cool, stirring occasionally, until thick enough to hold ribbons on the surface (about 15-20 minutes).
6.  While chocolate is cooling, whip up the remaining cream (1 1/2 cups) until nearly stiff peaks.  If chocolate is not ready to use, refrigerate whipping cream until ready to use. 
7.  Once chocolate is completely cool, fold in the beaten whipped cream.
8.  Cover with plastic wrap and refrigerate until firm - about 4-6 hours.  (I usually do over night)
9.  Enjoy!!  

October 1, 2013

German Chocolate Cupcakes (repost)

I'm craving these today.....  I wish I had time to make them....  My mouth is watering....
 

I've never made German Chocolate Cake or German Chocolate anything, but I've always liked it.  I saw these cupcakes and I had to try them!  They are so good you guys!! 
The only thing is my Grandma's (and most others that I have had) German Chocolate cakes are usually more dense with a little different taste than these cupcakes.  These cupcakes are delicious, but you can still tell that they are made with a box mix even though you add other stuff to the box mix.  Also, the cupcake is so light and fluffy, that it is almost too light and fluffy to hold the layers of frosting.  I made both mini cupcakes and regular sized, and the regular sized were able to hold up to the frostings a lot better. 
I changed how she mixed the ingredients together as well, because I am way too lazy to do the sifting and alternating (unless I am making an angel food cake!).  My cupcakes turned out so fluffy, if they were any fluffier I would have been chewing on air... 
Also, I didn't have evaporated milk for this recipe and after some searching the internet I just made my own! 
I will definitely be making these again!

German Chocolate Cupcake Recipe
Recipe from HERE
Chocolate Cake:
1 box Devil’s Food Cake Mix
3 eggs
½ cup oil
1 teaspoon vanilla extract
¾ cup buttermilk
1 cup sour cream
German Chocolate Frosting:
1 cup evaporated milk
1 cup sugar
3 egg yolk, lightly beaten
1/2 cup butter
1 ½ teaspoon vanilla extract
1 ½ cup chopped pecans
1 ½ cup flaked coconut
Chocolate Buttercream:
4 ounces cream cheese
½ cup butter
2/3 cup unsweetened cocoa
3 cups powdered sugar
2 teaspoons vanilla extract
1 tablespoon milk or cream (if needed)


Directions:

1. Preheat oven to 350 degrees and line two muffin tins with 20-24 cupcake liners.


2. In a large bowl, gently combine oil, eggs and vanilla extract.


3. Add cake mix and buttermilk and mix until combined.


4. Add Buttermilk and stir until combined.

5. Add sour cream and mix.
6. Fill cupcake liners ¾ full and bake for 18-22 minutes or until an inserted knife comes out clean.
7. German Chocolate Frosting: On medium heat in a sauce pan, constantly stir evaporated milk, sugar, egg yolks and butter until thickened. (Basically, until it boils and it will take approximately 15 minutes.) Stir in vanilla extract, pecans and coconut. Let cool.
8. Chocolate Buttercream: Beat cream cheese and butter for 4 minutes. Add cocoa, powdered sugar and vanilla extract. Let beat for 3 minutes. If it is too thick, add milk. If it is too thin, add powdered sugar. Or if it is not dark enough, add more cocoa. This recipe for the buttercream you'll definitely have to play with a little bit.
9. Pipe or spread the German Chocolate Frosting on top of cupcake then spread the buttercream on top of that.  You can see the fancy way she did her frostings HERE.  I didn't feel like piping anything.
10.  Enjoy!! They are so yummy!

August 31, 2013

Sinful Saturday...Copy Cat Snickers Bar

Pin It

I just decided to have a Sinful Saturday theme on my blog.  I'll post new desserts or feature old ones like today.  I'll be posting only the most insanely delicious items that make you gain 10 pounds just by looking at them, and items that you just CAN'T. STOP. EATING.

I'm sorry.  And, you're welcome.

From March 2012

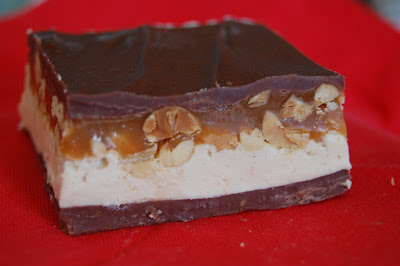
Oh. My. Goodness.  This recipe is sooooo good!  We liked the twix bars, but we think this recipe is way better.  So good!  I'd choose these over a regular old Snickers bar any day!! 

This is a great recipe, and I only made two minor changes to the recipe.  1- this recipe combined the nougat and the nuts, but in a real Snickers bar they are layered, so I layered them.  2 - The caramel calls for whipping cream, but I just used the evaporated milk that was already open from this recipe instead of buying another ingredient.  It turned out great!!

This recipe does take a little time to make, having to wait for the layers to cool.  But, you could make the first part one morning, the next part in the evening, and the other part the next day, so you aren't tied to the kitchen if you don't have the time. 

Copy Cat Snickers Bar Recipe:
Adapted from  HERE

For the Bottom Chocolate Layer:
1¼ cups milk chocolate chips
¼ cup creamy peanut butter

1. Grease a 9×13-inch baking pan. Line with parchment paper (I used aluminum foil), then grease the parchment paper; set aside.

2. Make the Bottom Chocolate Layer: Melt together the chocolate chips and peanut butter in the microwave until completely smooth and melted, stirring every 30 seconds. Pour into the prepared baking dish and, using a spatula, smooth into an even layer. Refrigerate until completely cool and hard, about 30 minutes.

For the Nougat Layer:
4 tablespoons unsalted butter
1 cup granulated sugar
¼ cup evaporated milk
1½ cups marshmallow fluff
¼ cup creamy peanut butter
1 teaspoon vanilla extract
1½ cups salted peanuts, roughly chopped

3. Make the Nougat Layer: Melt the butter in a medium saucepan over medium heat. Add the sugar and evaporated milk, stirring until dissolved, and bring to a boil. Reduce the heat to low and cook for 5 minutes, stirring occasionally. Remove the pan from heat and add the marshmallow fluff, peanut butter, and vanilla extract, stirring until completely smooth. Pour over the bottom chocolate layer. 

4.  Pour chopped peanuts over nougat. Again, refrigerate until completely cool, about 30 minutes.

For the Caramel Layer:
14 ounces caramels, unwrapped
¼ cup evaporated milk

5. Make the Caramel Layer: Combine the caramels and the evaporated milk in a small saucepan over low heat. Melt, stirring occasionally, until smooth. Once completely melted, cook for an additional  minute or two, stirring frequently. Pour the caramel over the nougat layer. Refrigerate until completely cool, about 30 minutes.

For the Top Chocolate Layer:
1¼ cups milk chocolate chips
¼ cup creamy peanut butter


6. Make the Top Chocolate Layer: Melt together the chocolate chips and peanut butter in the microwave until completely smooth and melted, stirring every 30 seconds. Pour over the caramel layer and, using a spatula, smooth into an even layer. Refrigerate until completely cool and set, 30 to 60 minutes.

7. Using the parchment liner, remove the bars from the pan and cut into 32 pieces. You can store these in the refrigerator or at room temperature. The filling is yummiest at room temperature, but the chocolate can get a little melty especially if it is warm.   They are yummy straight out of the fridge too!!!

8.  Enjoy! 


See you at the gym...     :) 

January 12, 2013

Raspberry Bread Pudding


Okay, so ignore the icky picture, this recipe is delicious!!!  I think my pudding was a little more wet than this fabulous picture from where I got the recipe from because I used frozen raspberries, and they used fresh.  Frozen berries have a little more liquid in them - especially when the recipe calls for 5 cups of berries!  The sauce is absolutely divine as well, I'm going to see how many desserts out there I can drizzle it with!!!  So good!!!

Raspberry Bread Pudding Recipe:
 
1 1/2 loaves aged or day old, white bread (heavy type of bread)
1 qt. heavy cream (I used 2 c. 2 % milk and 2 c. cream)
3 C. sugar
1 egg
1 tsp. vanilla
5 C. raspberries, fresh or frozen (original recipe used fresh - if using frozen you don't need as much)
1 C. sugar
1/2 C. apple juice
1.  In a large bowl mix the cream, sugar, egg and vanilla.
2.  Cut bread into 1 1/2 inch cubes and add to cream mixture, coating the bread well. Let stand 30      
     minutes, stirring every 5 minutes to allow cream to absorb.

3.  Mix the raspberries, sugar and apple juice, stirring until sugar is dissolved.
4.  Layer a 9x13 inch baking pan 3/4 full with the bread mix and pour fruit filling over the bread mix, spreading evenly.  Top with the remaining bread.
 
5. Bake 40 minutes at 375.
6.  Serve warm topped with vanilla cream sauce.
(If you want it to cut into nice squares you can chill it and then cut it into squares, then microwave it
for 20-25 seconds per piece and top with sauce.)

Vanilla Cream Sauce Recipe
1 1/3 C. butter
5 T. flour
3 C. heavy cream
1/2 tsp. salt
2 tsp vanilla
2/3 C. sugar
1.  Melt butter in medium saucepan and add flour.  Whisk 10 minutes until it has a nutty aroma, do not brown.
 
2. Add salt, cream and sugar until mix is thick.
 
3. Remove from heat and stir in vanilla.
 
4. Serve warm over the pudding 

November 7, 2012

Copy Cat Wendy's Frosty Recipe


I got this recipe for chocolate ice cream from a friend years ago, and almost every time I've made it, someone comments that it tastes like a Wendy's Chocolate Frosty.  It's a bit creamier than a frosty, but the taste is definitely similar.  Enjoy!!
 
Copy Cat Wendy's Chocolate Frosty Recipe
(or Chocolate Ice Cream)
 
1 can sweetened condensed milk
1/3 c. Cocoa Powder
2 c. whipping cream
3/4 c. milk (whatever percentage  you want to use)**
1 T. vanilla
 
1.  In medium sauce pan stir together condensed milk and cocoa.  Cook over low heat, stirring constantly until mixture is smooth and slightly thickened, about 10 minutes.  Remove from heat; cool slightly. 
 
2.  Gradually add whipping cream, half and half, and vanilla beating with a whisk until well blended. 
 
3. Refrigerate until cold.
 
4.  Pour in ice cream maker (according to the directions on your ice cream maker) and it's done when it has reached desired consistency (usually about 25-30 minutes).
 
5.  Serve immediately.  I personally don't think homemade ice cream is as good after it has hardened too much.
 
**  The original recipe called for 1 c. half and half.  I don't often have half and half and just use regular milk, and I don't know why I cut down on the amount either I've been making it so long...  :)


November 6, 2012

Copy Cat Hostess Cakes Recipe


I helped throw a black and white baby shower, so these made the menu!  Even though they aren't "from scratch" they were sure delicious.  I don't buy Hostess Cakes or Twinkies because they have a bazillion unnatural ingredients in them, so these are at least better than buying them.  These were gobbled up super fast and were totally better than the real thing!!! 
 
Copy Cat Hostess Cakes Recipe:
Recipe from HERE
 
Cupcakes:
• 1 box cake chocolate cake mix (or your favorite cake recipe)
• water, eggs and oil called for on the cake mix box
 
Filling:
• 1 cup whipped vanilla frosting
• 1/2 cup marshmallow creme

Frosting:
• 1 cup whipped chocolate frosting
• 1/2 cup semi-sweet chocolate chips
• 2 tsp. corn syrup

For the Loops
• 3 Tblsp. whipped vanilla frosting

1. Bake cupcakes according to directions on package. Let cool in pan for 10 minutes, continue to cool on cooling rack for another 30 minutes or until cooled completely.

2. With end of round handle of wooden spoon, make deep, 1/2-inch-wide indentation in center of each cupcake, not quite to the bottom (wiggle end of spoon in cupcake to make opening large enough).

3.   In small bowl, mix 1 cup vanilla frosting and the marshmallow creme. Spoon into small resealable food-storage plastic bag. Cut 3/8-inch tip off 1 bottom corner of bag. Insert tip of bag into each cupcake and squeeze bag to fill.  I didn't fill mine enough, so angle your bag and squeeze in a few different directions to really get more in the filling.  (See pics below -  take a knife and remove excess filling from top of cupcake)

4. In small microwavable bowl, microwave chocolate frosting, chocolate chips and corn syrup uncovered on High 30 seconds; stir. Microwave 15 to 30 seconds longer; stir until smooth. Dip top of each cupcake in frosting. Let stand until frosting is set.

5. Spoon 3 tablespoons vanilla frosting into decorating bag or small resealable food-storage plastic bag. Cut tiny tip off 1 bottom corner of bag (she used Wilton tip #5). Pipe loops on each cupcake.

the filling overflows a little bit
Take a knife and brush off the extra filling so icing will be smooth.

Make your loopty loops!

March 17, 2012

BYU Mint Brownie Copy Cat Recipe


Here's a perfect recipe for your St. Patty's Day Celebrations! 

These take me back to my BYU days and my occassional breakfast of champions, consisting of:  a mini loaf of wheat bread with honey butter, milk, and a mint brownie!  Weird combo I know, but so delicious! 

I wouldn't say this recipe was exact, but it was pretty close.  The frosting on this wasn't as firm as the original.  So, that needs some tweaking.  I tried to tweak it but I didn't want to add any more powdered sugar than I already had....  next time I'll try something different. 

This wraps up Copy Cat Week. I hope you've gained 20 pounds... Just kidding, I've gained 20 pounds.

Any requests for next months Copy Cat Week?

BYU Mint Brownies Copy Cat Recipe
Recipe from HERE
  • 1 cup butter
  • 1/2 cup cocoa
  • 2 Tbsp. honey
  • 4 eggs
  • 2 c. sugar
  • 1 3/4 c. flour
  • 1 1/2 tsp. baking powder
  • 1/2 tsp. salt
  • 1 c. chopped walnuts {I omitted these}
  • 12 oz. chocolate icing {store bought or combine 2 cups powdered sugar, 1/4 cup butter, softened, 1/4 cup cocoa and 2-4 TBSP milk. Whisk.} (I made this recipe, and just went ahead and put in the 4 T. because I was distracted, so maybe next time I'll do one T at a time...)
Mint Icing
  • 5 Tbsp. butter
  • dash of salt
  • 3 Tbsp. milk (maybe use a tiny bit less...)
  • 1 Tbsp. light corn syrup
  • 2 1/3 cup powdered sugar
  • 1/2 tsp. mint extract {NOT peppermint!!}
  • 2-3 drops green food coloring

Melt butter and mix in cocoa. Allow to cool. Add honey, eggs, sugar, flour, baking powder, and salt. Mix well. Add nuts. Pour batter into a greased 9-by-13 baking pan. Bake at 350 degrees for 25 minutes. Cool 1 hour.  Or put in the freezer like I did.

Prepare mint icing: Soften butter. Add salt, corn syrup, and powdered sugar. Beat until smooth and fluffy. Add mint extract and food coloring. Mix. Add milk gradually until the consistency is a little thinner than cake frosting.
Place cooled brownies in the freezer for about 20 minutes. Then spread Mint icing on top. Return iced brownies to the freezer for about 30 minutes to stiffen the icing. Spread with a thin layer of chocolate icing.

If you want to cut nice squares, place back in the freezer for about 10 minutes before slicing.

Enjoy!!

March 6, 2012

Peanut Butter Swirl Brownies


Remember?  Tuesdays are dedicated to my love affair with Pinterest.  Here's one of the latest recipes I tried that I thought was quite tasty!!!!!  Link to original recipe HERE


Peanut Butter Swirl Brownies Recipe
Brownie Mixture
1 Box Brownie Mix (I used Betty Crocker Fudge Brownies)
1/4 c. oil (I had to sub with butter)
1/4 c. water
2 eggs
Whisk ingredients together and spread into a greased 9x13 pan.
Peanut Butter Mixture
3/4 c. sugar
1/2 c. peanut butter
1/4 c. flour
2 eggs
Whisk ingredients together and put spoonfuls of mixture on top of brownie mixture.  Take a toothpick or a knife and swirl around til evenly spread.  (Or not so evenly, if that's what you like...)
Bake at 350 for 40 minutes. 
I drop the peanut butter in clumpsand then swirl with a toothpick below or use a knife
 

February 23, 2012

Copy Cat Tuxedo Cheesecake from Cheesecake Factory


For Valentine's Day, I wanted to make John our favorite cheesecake from The Cheesecake Factory, The Tuxedo Cheesecake.

I searched a really long time to find a recipe, and unfortunately, I won't be sharing one because it was not a good recipe! 

As I was following this recipe, for some reason, my common sense slipped away, and I followed bad directions despite the thoughts in my head saying, "that won't work," or "granulated sugar is going to make the cheesecake part grainy."  Don't even get me started on the mascarpone layer....  I even called John at work to tell him how mad I was while I was making this.  Mad at myself for not using my common sense, and my own cooking skills. 

I finally stopped using this chicks recipe and improvised the rest.  Despite that - it was still good, crazy rich, but edible.  I mean it was all eaten...

So, I'm sorry I don't have a recipe to share, but I'm going to create my own recipe for this cheesecake, and then I'll post it on the next Copy Cat week.  Sound good?  Wish me luck!

February 21, 2012

Copy Cat Chocolate Twinkies (er cupcakes...)

I should add that the next day the creamy center has set up more than what is shown here like a twinkie filling

Remember that I've dedicated Tuesdays to Pinterest?  Well, now you know.  So, today I kill two birds with one stone.  I got this recipe off of Pinterest, and it's a Twinkie Copy Cat recipe.  I think I stopped eating Twinkies when I found out they had like 30 non food ingredients, ick!  So, I thought it would be fun to make these! 

I can't take all the credit for making these, because really, I just assisted John.  I also couldn't get a better picture...

I don't have a canoe pan to make the twinkies (Gasp!  I know!  A kitchen gadget I don't have...), so we just did cupcakes instead. 

You can see on the left cupcake where we filled it with the filling , and the cupcakes on the right is after I sliced it in two so you could see the filling inside. 

This recipe is a good recipe, it turned out perfectly.  The cake was perfectly spongey just like a Twinkie, and so was the filling.  Although the recipe is great and is what it says it is, both John and I would just rather have a regular cupcake, or another dessert.  But, it is good!  And, the best sponge cake I've had. 


This made about 3 dozen cupcakes.


Chocolate Twinkies Recipe:
Created by Simple Math Bakery

Snack Cakes:
1 1/2 cups all-purpose flour
4 tablespoons corn starch
1 1/2 cups granulated sugar
1/2 cup cocoa powder
1 tablespoon baking powder
1 teaspoon salt
1/2 cup canola oil
3/4 cup cold water
1 teaspoon vanilla extract
7 eggs, separated

Preheat the oven to 350°. Spray a canoe pan or cupcake pan with cooking spray and set aside.

Using an electric mixer, beat the egg whites until they are very stiff. They should hold their shape when removed from the bowl. Set aside.

Combine the flour, corn starch, sugar, cocoa powder, baking powder, and salt in a large bowl. Whisk together or beat on low speed for a minute, until combined. Add oil, water, Vanilla, and egg yolks. Beat on medium speed until smooth.

Using a rubber spatula, gently scoop 1/3 of the egg whites into the batter. Fold the egg whites in by slicing the spatula through the center of the bowl, gently scooping batter from the bottom and wrapping it over the top. Turn the bowl 1/4 turn and repeat until the egg whites are barely visible. Repeat this process with each remaining 1/3 of the egg whites.

Spoon the batter into the pan, filling the wells 2/3 full. Bake for 8-12 minutes, or until cakes are golden brown and just starting to pull away from the sides of the pan. Cakes will puff up when cooking, but will settle as they cool. Cool the cakes in the pan for 5 minutes, then gently remove them from the pan using a rubber spatula. Allow them to cool, flat side down, directly on the cooling rack.

Filling:
2 tablespoons all-purpose flour
1/2 cup milk
1/4 cup cocoa powder
1/2 teaspoon vanilla
1/2 cup bittersweet chocolate chips (60% cacao)
1/2 cup unsalted butter
1/2 cup granulated sugar

In a small saucepan, heat the flour, milk, and cocoa powder over medium heat, stirring constantly. When the mixture becomes a paste (about 5 minutes), remove from heat and allow to cool for 1 minute. Stir in the vanilla extract. Place a piece of plastic wrap directly onto the surface to prevent a skin from forming, and set aside to cool completely.

Melt the chips in the microwave in 30 second intervals, stirring after each interval.  Allow to cool until just barely warm.

With an electric mixer, cream the butter and sugar until light and fluffy. Add the cooled milk mixture and beat until combined. Pour in the cooled melted chocolate and beat for about 5 minutes, until smooth and creamy.

Use the pastry filler that comes with the pan (or a pastry bag with round tip) to fill the cakes. Place the tip about halfway into the cake and squeeze gently. Holding the cake in your palm while filling it will allow you to feel when it is full. Fill each cake 3 times to ensure that each bite contains ample chocolate filling! (With the cupcakes we just filled once)

Enjoy!!

January 31, 2012

Heart Attack Brownies


I've decided that Tuesday will be dedicated to my love affair with Pinterest.  I've tried so many recipes that I've seen on there, and I will share the good ones! 

I got the idea for these brownies from Pinterest, which were pinned from HERE

When John saw what I was making, he wasn't very happy.  (What?? I know, right?)  He's like, why are you putting three desserts into one??

He has affectionately named these brownies, Heart Attack Brownies. 

For this recipe, you could totally make everything from scratch, and then just put it together the same, and though I'm a from scratch kind of gal, I am definitely not opposed to whipping out ready made ingredients now and then like, brownie mixes, and cookie dough...

Heart Attack Brownie Recipe

1 roll of cookie dough
Oreos
1 brownie mix prepared

Press your cookie dough in a 9x13 pan.  Lay oreos on top (though if I make this again, i will crush them into chunky pieces), top with brownie batter.  Cook  at 350 degrees until brownies are cooked to your desired gooiness. 

I couldn't give you an easier dessert recipe than this...  Though they may give you a heart attack...

March 17, 2011

Pecan Cheesecake Pie


Do you like pecan pie? And cheesecake? Then you'll love this recipe!!

Here's another recipe I cut out forever ago (2007!), and I was going to make this at Thanksgiving last year, but it got cut from my bake list. I don't know if you remember or not, but I should have made this one, and none of the other ones!!!

I love it! The perfect blend of everything! I will never make a plain pecan pie again. Okay, I don't think I've actually ever made one... but now I won't have to! It's seriously is so delicious and easy!

Pecan Cheesecake Pie Recipe (From HERE)

1/2 (15 oz.) packaged refrigerated pie crusts
1 (8 oz.) cream cheese softened
4 large eggs
3/4 c. sugar, divided
2 tsp. vanilla extract, divided
1/4 tsp. salt
1 1/4 c. chopped pecans
1 c. light corn syrup

I made my own pie crust, here's the recipe:

1 c. flour
1/2 tsp. salt
6 T. butter
3 T. cold water

Mix flour and salt. Cut in butter until particles are pea sized. Sprinkle with water, a little bit at a time, tossing with fork until all flour is moistened. Shape dough into ball, roll out, place in pie plate. (Remember, the less you handle the dough the better & flakier)

1. Preheat oven to 350. Make pie crust, put it into 9 inch pie plate according to directions

2. Beat cream cheese, 1 egg, 1/2 c. sugar, 1 tsp. vanilla, and salt at medium speed with electric mixer until smooth. (Don't forget to cream your cream cheese first or you get lumpys.) Pour cream cheese mixture into pie crust; sprinkle with pecans.

3. Whisk together corn syrup and remaining 3 eggs, 1/4 c. sugar,and 1 tsp. vanilla. Pour mixture over pecans.

4. Place pie on a baking sheet. Bake at 350, on the lowest rack in the oven, 50-55 minutes or until pie is set (It took mine about an hour). Cool completely on wire rack (about an hour). Server or cover and chill up to two days.

This pie could go on your Easter Dinner bake list!

January 31, 2011

How to make your own Ice Cream Cake

I started making my own ice cream cakes about seven years ago. I've always loved ice cream cakes, but started being disappointed in the quality or taste of the ice cream cakes we were buying - so I tried my hand at making my own.

What I love about these is that you can totally make them your own way! You choose all the flavors and fillings. We let the birthday boy or girl customize their own cake!

This cake was a surprise for my neighbor's birthday, and her husband told us what flavors to use.

For this cake I used fudge ripple and chocolate ice cream with an oreo cookie layer, a fudge frosting layer, and a whipped cream topping. (or whuuped cream as my son calls it...)

FOR CAKE & FILLINGS - Depending on the size of cake you are making will determine how much ice cream you will need - usually at least two - 1.5 quarts. The one thing to think about for fillings is that whatever you use will freeze (duh...), but I've used brownies before, and when they freeze they don't thaw at the same rate as the ice cream and they are pretty hard to eat. Candy bars can be tricky as well - very hard after they freeze. We love Snickers, but they are hard to eat when they are frozen. If you use candy bars, use ones with a softer filling.

You can use any kind of mold for your ice cream cake. I make this ice cream cake to have a shape, but you can make it and leave it in a 9 x 13 pan if you'd like too. For this cake I used my Kitchen Aid bowl.

1. Set one flavor of your ice cream out to thaw.

2. Crush your fillers - In this case, oreos.


3. Line the inside of your mold with plastic wrap. Make sure to leave a lot of overhang on the outside of your mold. If you are leaving your ice cream cake inside a 9 x 13 pan, you don't have to worry about this step.


4. Scoop and press softened ice cream into the bottom of your mold. You don't want to use melted ice cream, because it changes the consistency of your ice cream. It makes your cake more icey than creamy like ice cream.


I use the ice cream around the outside, usually, because it gets softer first.


5. Top with your filler layer. Put in freezer for at least an hour. When that hour is up,set out your next flavor of ice cream to soften.


6. Put the next softened layer of ice cream on top of your filler layer. It helps to slice the softened ice cream with a knife too. It looks like the picture below at first:


Then, you spread it out, and it looks like the picture below:

7. Top with your next layer. OR - I put back in the freezer for an hour and make my chocolate frosting. My frosting has to cool a little before I add it to my ice cream or it melts. You have to be fast after you pour it and hurry it back to the freezer or it will melt like the picture below, because I had to take a picture of it.


8. Let harden another hour, then set out the ice cream for your next layer to soften. Spread on next leayer of ice cream.

9. You could make a gigantic ice cream cake with a ton of layers, but this is where this one ends. I used oreos as my last layer. When I flip the mold out, I have oreos as the bottom layer to soak up the ice cream if it melts while sitting out to cut it. You could also use a cake as the bottom layer, but it needs to be a sturdy, dense cake so it wouldn't be crushed by the weight of the ice cream.


10. Let the cake set until completely frozen. When it is frozen, you should be able to completely pull the cake out by the plastic wrap, like the photo below:
11. Place platter on top of your mold, and turn the cake out. Pull off plastic wrap.


12. Whip 2 cups of whipping cream with sugar and vanilla to taste. Spread on frozen cake. Put back in freezer. You could serve it right after you cover it, but if you freeze the whipping cream layer you can decorate that top layer with icing - writing happy birthday or whatever. If I had had enough oreos I would have covered the whole cake with them. You would have to do that before your whipping crem layer is frozen.


Before slicing let cake thaw briefly.


My whipped cream layer was not frozen. Your cake cuts nicer (looks nicer) if it is. This looks really cool when it is a sheet cake mold - just like in the store!

Enjoy!!

January 20, 2011

Super Easy Blackberry Cobbler


I love cobblers. We had a lot of cobbler growing up. I'm used to the bready - doughy top cobbler, but this cobbler recipe is different. It has a crispy top, but the bready part is more underneath. Any cobbler is easy to make, but this cobbler recipe is by far the easiest!!

I cut this out of a magazine, but have no idea which one or when...

Easy Blackberry Cobbler Recipe

4 c. frozen blackberries (recipe calls for fresh, but I use the frozen ones we picked last summer!)
1 Tbsp. lemon juice
1 large egg
1 c. sugar
1 c. all-purpose flour
4 Tbsp. butter melted (recipe calls for 6)

For this recipe you can use an 8 inch square baking dish, I use 6 - 7oz. ramekins. This recipe mentions you could serve it in mugs too, which would be fun!

1. Preheat oven to 375. Place blackberries in a lightly greased (I forgot to do this a few times, and it was fine). Sprinkle blackberries with lemon juice. (I didn't have any lemons or lemon juice the last time I made these, and it definitely tastes better with the lemon juice, but if you don't have any on hand and want to make it, just sprinkle your blackberries with some sugar at least.)

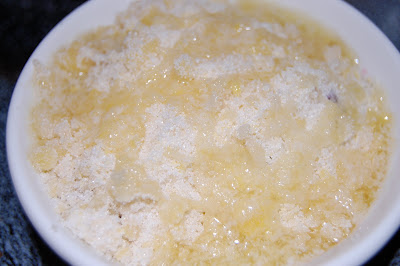
2. Stir together egg, sugar and flour until mixture resembles coarse meal. Sprinkle over blackberries.
3. Drizzle melted butter over topping. (I use a dessert spoon and drizzle about two of those spoonfuls over each one.)


4. Bake for 40 minutes or until lightly browned and bubbly. Let stand 10 minutes. Serve with ice cream!!

A little bit of summer sunshine in the winter!!! Enjoy!
Related Posts Plugin for WordPress, Blogger...