Showing posts with label Christmas Craft. Show all posts

December 28, 2019

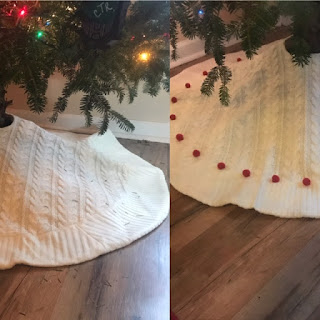
My Tree Skirt Project

Before/After

I got a new tree skirt this year to match my stockings.  However, I just wanted to add a little bit of red to it.  I can't knit or crochet, but I really wanted some popcorn thingys on it to match my stockings.  Well, I came up with my own solution and did it yesterday! I love it so much!!


I couldn't get a complete before picture, because I was just too excited to sew on my first pom pom ball.


How I did it:

I wanted my pom poms to be the same texture as my tree skirt, so I didn't want to make poofy yarn pom poms.  I had some sleeves of a red sweater from my craft room that I used to make re-purposed stockings years ago (thankfully not in the storage unit).  They matched perfectly! All I needed was, thread, scissors, and I used those packaging pillow things as the stuffing of my pom poms.  Reduce, reuse, recycle - bonus!


I used a fourth of each square in one pom pom

I used a spool of thread for the size of my circles.

I rolled up the plastic, placed it in the middle of the circle, and stitched around the outside, then pulled the stitch closed to form my pom pom. 

Then, I sewed each pom pom on the tree skirt. 

If you can't knit or crochet, now you can make your own pom poms to add texture to a fun project!

December 20, 2013

Refashion Friday - Upcycled Sweater to Christmas Stocking


When I started my business years ago, I started with mostly re-purposed items, like my Christmas Sweater Stockings.  I still love to make them!! 

I didn't get any listed earlier in the holiday season, but you can see some in my Etsy store now

December 16, 2013

Greenery Wreath

Pin It

I walked into the florist shop last week and asked if they had any myrtle.  The lady said, "What is myrtle???"  I was confused...  A few moments later I was inside her cooler telling her the name of the greenery in it.  As I left, the owner of the floral shop said, "Don't go telling people that we don't know what we're doing."  I gave a courtesy laugh, and in my head I thought, "You DON'T know what you're doing!"

It was pretty funny, but I came away with some myrtle and I made this wreath for $3.20.  I already had the velvet ribbon so that is not included in the cost.


I turned the greenery above into the wreath below. 


Honestly, it didn't work how I thought it would, so it was a little more complicated than I thought it would be, but the end result was the same! 

Love!

p.s. My nine year old called this a "Moaning Myrtle" wreath... Harry Potter anyone?

December 10, 2013

Copy Cat Snow Globe - Tutorial

Pin It

I've seen the snow globes that you can make out of a mason jar, but I had never seen them like this until I saw it on a friend's Instagram widget on her blog that she took at some festival or something.  Immediately I knew we would be making these for family night, and we did!  (Trust me, our family home evening nights are NEVER this involved!)

I knew my kids would enjoy shopping for and picking out their little figures.  I had to reign in my nine year old son because he wanted to put everything and the kitchen sink in his.  He had to have birds in his trees even though they weren't going to be "to scale."  They really enjoyed it, and fought over the snow in the store, of course!

This is a cheap project if you have bowls/containers already lying around your house!


I love that each globe represents each of my kids so well...

We had something else picked out for my three year old, but when I saw this train I knew I had to do it!  He LOVES it.  He was a bit sad for a second when he realized he wasn't going to be able to pull the train around anymore after being put inside the snow globe.. 

I realized this morning that this is so appropriate for my six year old daughter - always picking on her brothers (everyone)!

This represents my nine year old, happy go lucky!


Snow Globe Tutorial

Fish bowl (or any clear container - could be plastic for the little ones)
Snow
Foam board
Hot glue gun (and glue sticks!)
Little figurines and trees (Now is a good time to get them - they are 60%, but slim pickings!)
Puffy Paint (I wasn't sure they even made this anymore, but they do!)

1.  Trace the opening of your container - then cut it out inside the line a bit. You kind of have to play with this.


2.  Glue your figures to the foam board.


3.  Put a pile of snow in the middle of your foam board, kind of piled up in the center.


4.  Put hot glue around the rim of your container.


5.  This picture is kind of misleading because first I actually put the bowl on top of the foam board while the foam board is on the counter and press to make a seal, then if I have to adjust any I pick it up and do so.  That's what the picture shows below. I use hot glue to seal up any cracks in between the foam board and the container.


6.  Then, I put the puffy paint (snow) around the bottom and any foam board still visible.


7.  Leave upside down to dry.


8.  Three drying snow globes!


9.  After dried, shake and enjoy! 


**  I wasn't sure I was going to like this snow once I opened it, but I like how some sticks to the container making it look like it is always flurrying inside!!  Love!
Related Posts Plugin for WordPress, Blogger...