Showing posts with label Recipes. Show all posts

March 21, 2020

Papa's Bread (or rolls)


For Thursday's home economics class, we made bread!  This is my dad's recipe.  My dad made bread a lot!  He always made the rolls for any holiday.  I'm pretty sure he took his mother's recipe and added the wheat, molasses, honey, and flax seed. Don't worry, he'll correct me if I'm wrong. My mom always liked to make food healthier, so I'm sure she was behind adding all of those things, and subbing the honey and molasses for regular sugar.  

This bread is dark in color. It actually is not because of the wheat flour, because I use white wheat flour because it gives bread a little bit of a lighter texture.  It is this color because of the molasses.  My grandparents raised their own sorghum and made their own molasses. The molasses that I buy in a store now is darker than their molasses, maybe even called "black strap molasses," which they and my dad would say "isn't fit to eat." 

Don't worry, if you don't have molasses on hand, you can sub with all honey.  If you don't have honey on hand, you can sub with sugar. 

I did not have any flax seed to add either. You can leave that out.  You can make all white bread if you want with this recipe too, leave out the wheat flour.  

I'm too lazy to type up this recipe, so here it is from my cookbook, and I'll add some other notes below. 


Notes/Tips: 

As you can see, this recipe is for rolls, but we made bread. 

Don't heat the water and sweeteners very hot, just hot enough to activate the yeast. You don't want to kill the yeast. 

Before you get to the kneading part, you want to touch the dough with your finger. Does a lot of dough stick to your fingers? If so, add a little more flour.  You keep doing this until you can touch the dough and barely any dough comes off on your fingers, or none at all.  But don't over do it or it will be too dry.  

I don't knead bread by hand anymore.  I make it in my kitchen aid with a bread hook.  Once I get to the kneading part, I turn that sucker up and let it go to town for a while.  Even though kneading dough is pretty stress relieving and builds muscles, I just don't have time for that. 

Where it says raise 20 minutes - I raise until double.  For bread, you punch down, then put into two loaf pans, and raise until double again.  


It raised double the size of the first picture


It raised about double the side

I always brush my bread with butter when it comes out of the oven

I was taught to let bread cool on it's side, I tried to look up the reason why, but I din't find anything.  So, who knows?

This was a great home school lesson, because they were able to see the yeast activated, see how they rise, and eat the finished product, of course. Enjoy! 


December 30, 2019

Hello Dolly Cookies


My mom made these cookies when I was growing up.  This summer, I had a random craving for them and pulled out the recipe I wrote down as teenager.  This is how dated the recipe is -  it called for margarine.  (I just sub all old recipes that called for margarine with butter.) This is a super yummy and super easy recipe. 

This is the original recipe below in my ugly teenage handwriting that would flip flop back and forth from all caps to lower case.  It's not much better to this day. But, this recipe card is one reason why I need to blog or record all of my recipes somewhere... I pull up my blog almost on a daily basis to pull a recipe from because it's so much quicker than looking through my cookbooks or pins. And, I love hearing that my friends and family do it too! Yay! But, also most of my cookbooks and recipe cards are covered with food or ruined with liquid, so it's good to have them in a place where they will be protected from my messy cooking and messy children.


Most Hello Dolly cookies have butterscotch chips in them, but my mom's recipe didn't call for them.  When I was at the store, I saw these salted caramel chips, and thought they would be a yummy addition... and... THEY WERE!  Will always use them in the future - or until they no longer sell them.


Hello Dolly Cookies Recipe

1/2 c. melted butter
2 c. graham cracker crumbs (I make mine in a mini food processor)
1 c. semi-sweet chocolate chips
1 c. caramel chips
1 c. grated coconut
1 can of sweetened condensed milk


1.  Melt butter and mix with graham crackers.  Press into 9x9 square pan.

2.  Sprinkle pecans, chocolate chips, caramel chips over top of the crust.

3. Sprinkle coconut over the top.  Pour sweetened condensed milk over the top, covering evenly.

4.  Bake at 350° for 30 minutes.  To cut perfect squares, wait for them to be cooled.

February 4, 2012

Sausage Bean Chowder


Total comfort food right here.  My mom used to make this, and eating it this week totally reminded me of her.  She was a big soup maker.  One thing I'm starting to wish I knew with all of her recipes was where she got them from.  I wish I knew who gave them to her, or if she just came across it in a magazine, or if she just came up with it herself, because she always had those ingredients on hand.  My grandparents raised their own pigs to kill for sausage, so my parents always had their own sausage from them.  So maybe she made this because she always had sausage available to her? 

Well, I had sausage from my grandparents to use when I made this this week too!  Delish!!!!!!! 

This is a super simple recipe. 

Sausage Bean Chowder

1/2 lb sausage (I probably used a little more than that)
1 can of kidney beans (you could use 2)
1 16 oz. can tomatoes
4 c. water
1 small onion diced
1/2 large green pepper diced
2 large potatoes diced

1 bay leaf
1/2 tsp. garlic salt
1/2 tsp. seasoned salt
1/2 tsp. thyme
pepper to taste

1.  Brown sausage, drain.

2.  Combine all ingredients EXCEPT beans.  Simmer covered about 35 minutes.  Add beans and cook covered for 20 more minutes. 

3.  Enjoy!  Goes great with Cornbread...

4.  Notes:  Corn can be substituted for potatoes.  The sausage my grandparents makes is a little spicy, making this soup have a little heat.  The kind of sausage you use will determine the flavor of the chowder.

February 3, 2012

Corn Bread


Last year, I tried a lot of recipes to try and find the perfect corn bread recipe.  Remember my battle of the cornbreads?  Well, I never found one I loved, but just recently John helped me come up with a recipe we both like!!  I figured out the ingredient I don't like in corn bread, baking soda.  It leaves the corn bread with a bitter taste that I don't really like. 

Corn bread Recipe

1 c. flour
1 c. cornmeal (any kind, I think I like white best...)
4 T. sugar
1 T. baking powder
1/2 tsp. salt
2 eggs
1/4 c. oil
1 c. butter milk

Combine all dry ingredients.  Make a well in the center of your dry ingredients and then add all liquid ingredients and whisk until combined.  Don't over beat.  Heat cast iron skillet on medium heat with 1 T. oil in it.  Turn off once oil gets hot.  Pour batter in skillet, and transfer skillet to oven. Or you could use a square pan greased (can't remember the size).   Bake at 425 degrees for 15 minutes.  (or longer if using a square pan. 

It's extra yummy with home made apple butter...

If you have an extra yummy corn bread recipe you like, give it to me to try!!

February 7, 2011

Buffalo Chicken Dip


I like that my husband can cook. I guess, I don't know any woman that wouldn't like that their husband could cook.

For our Super Bowl gathering, which is really more of a feasting and game playing gathering rather than a watching the Super Bowl gathering... We sure did some feasting, and this morning I'm still not hungry. (Though, I may have indulged in some of this dip for breakfast...)

John usually gets to pick the menu for this party, and he found a recipe online that he wanted to try this year. Except when he made it, he totally made it his own, not even following the recipe. Awww... we're a match made in heaven.

You can see the original recipe HERE.


John's Buffalo Chicken Dip

8 oz. softened cream cheese

1 c. blue cheese salad dressing

1 c. ranch salad dressing

1/2 c. Frank's Red Hot Thick Cayenne Pepper Sauce

1 c. shredded Cheddar cheese

2 c. shredded Mozzerella cheese

2 cans (12.5 oz. each) Chunk Chicken Breast in water, drained


Put all ingredients into an electric fondue pot, and heat on low until melted. (John's one tip would be to cream the cream cheese with a mixer to make the melting go faster.) Serve with nacho chips and celery.

It's that easy! AND yummy!

This recipe could be baked as well. See original recipe for those details.

February 1, 2011

Tuna Romaine Salad


I think this was a South Beach diet recipe that I found when I did South Beach a few years ago. It's simple, yummy, and HEALTHY!

Tuna Romaine Salad

Romaine Lettuce (fresh, or bagged)
Cooked Edamame (I've used both the steamer bags in the microwave, and cooked and shelled my own)
Canned tuna (6 oz. can per person)
Green Goddess Dressing

Dressing Recipe:
Put the following in a food processor and mix:

1/2 avocado (average sized)
1/4 tsp. salt
1/8 tsp. pepper
3 T. mayo
3 T. non fat plain yogurt
1 T. water
1 T. milk (I wanted to try buttermilk this past time, because I think it would taste good, or even 2 T. buttermilk instead of the water too.)
2 scallions chopped (This time I grated an onion and used 1 T of the onion and juice combined)
1 small clove garlic minced (I also grate garlic on the micro plane grater)
2 T. chopped fresh basil (1 tsp. dried)
1 T. chopped fresh parsley (1 tsp. dried)
1 T. chopped fresh tarragon (didn't use because I didn't have)
2 tsp. fresh lemon juice


Put tuna, edamame, and dressing over Romaine.

Enjoy!

January 28, 2011

Heart Shaped Beignets - UPDATED POST SCRIPT ADDED


Last year, I made these heart shaped doughnuts as part of my Valentine's Day breakfast post, but didn't think they were anything so wonderful. When I saw this recipe for New Orleans Beignets in February's Southern Living magazine, I knew I would try it (in heart shapes for Valentine's Day, of course). I liked this recipe much better!! Of course, I had to make a dark chocolate sauce (basically a thick fondue) to serve them with to make them more yummy.

They didn't take long to make at all! The longest part is letting them chill.

Get the recipe here.


The trickiest part for me was getting the oil temperature right. I'm too lazy to get out a thermometer (I know...), so my first few were very dark on the outside, and doughy on the inside. It took some practice getting them right.


And, that, my friends, is why it's going to take me forever to lose my baby weight!!! Enjoy!!

POST SCRIPT: I forgot to tell you that this makes a ton! They are also delicious leaving off the powdered sugar, and just eating them covered with butter and honey.... mmmmmm! John even came up with the thought that they would be perfect for Navajo Tacos! They would be! So, with this one recipe -you can make a few meals! The recipe that keeps on giving! You're welcome.

January 20, 2011

Super Easy Blackberry Cobbler


I love cobblers. We had a lot of cobbler growing up. I'm used to the bready - doughy top cobbler, but this cobbler recipe is different. It has a crispy top, but the bready part is more underneath. Any cobbler is easy to make, but this cobbler recipe is by far the easiest!!

I cut this out of a magazine, but have no idea which one or when...

Easy Blackberry Cobbler Recipe

4 c. frozen blackberries (recipe calls for fresh, but I use the frozen ones we picked last summer!)
1 Tbsp. lemon juice
1 large egg
1 c. sugar
1 c. all-purpose flour
4 Tbsp. butter melted (recipe calls for 6)

For this recipe you can use an 8 inch square baking dish, I use 6 - 7oz. ramekins. This recipe mentions you could serve it in mugs too, which would be fun!

1. Preheat oven to 375. Place blackberries in a lightly greased (I forgot to do this a few times, and it was fine). Sprinkle blackberries with lemon juice. (I didn't have any lemons or lemon juice the last time I made these, and it definitely tastes better with the lemon juice, but if you don't have any on hand and want to make it, just sprinkle your blackberries with some sugar at least.)

2. Stir together egg, sugar and flour until mixture resembles coarse meal. Sprinkle over blackberries.
3. Drizzle melted butter over topping. (I use a dessert spoon and drizzle about two of those spoonfuls over each one.)


4. Bake for 40 minutes or until lightly browned and bubbly. Let stand 10 minutes. Serve with ice cream!!

A little bit of summer sunshine in the winter!!! Enjoy!

January 10, 2011

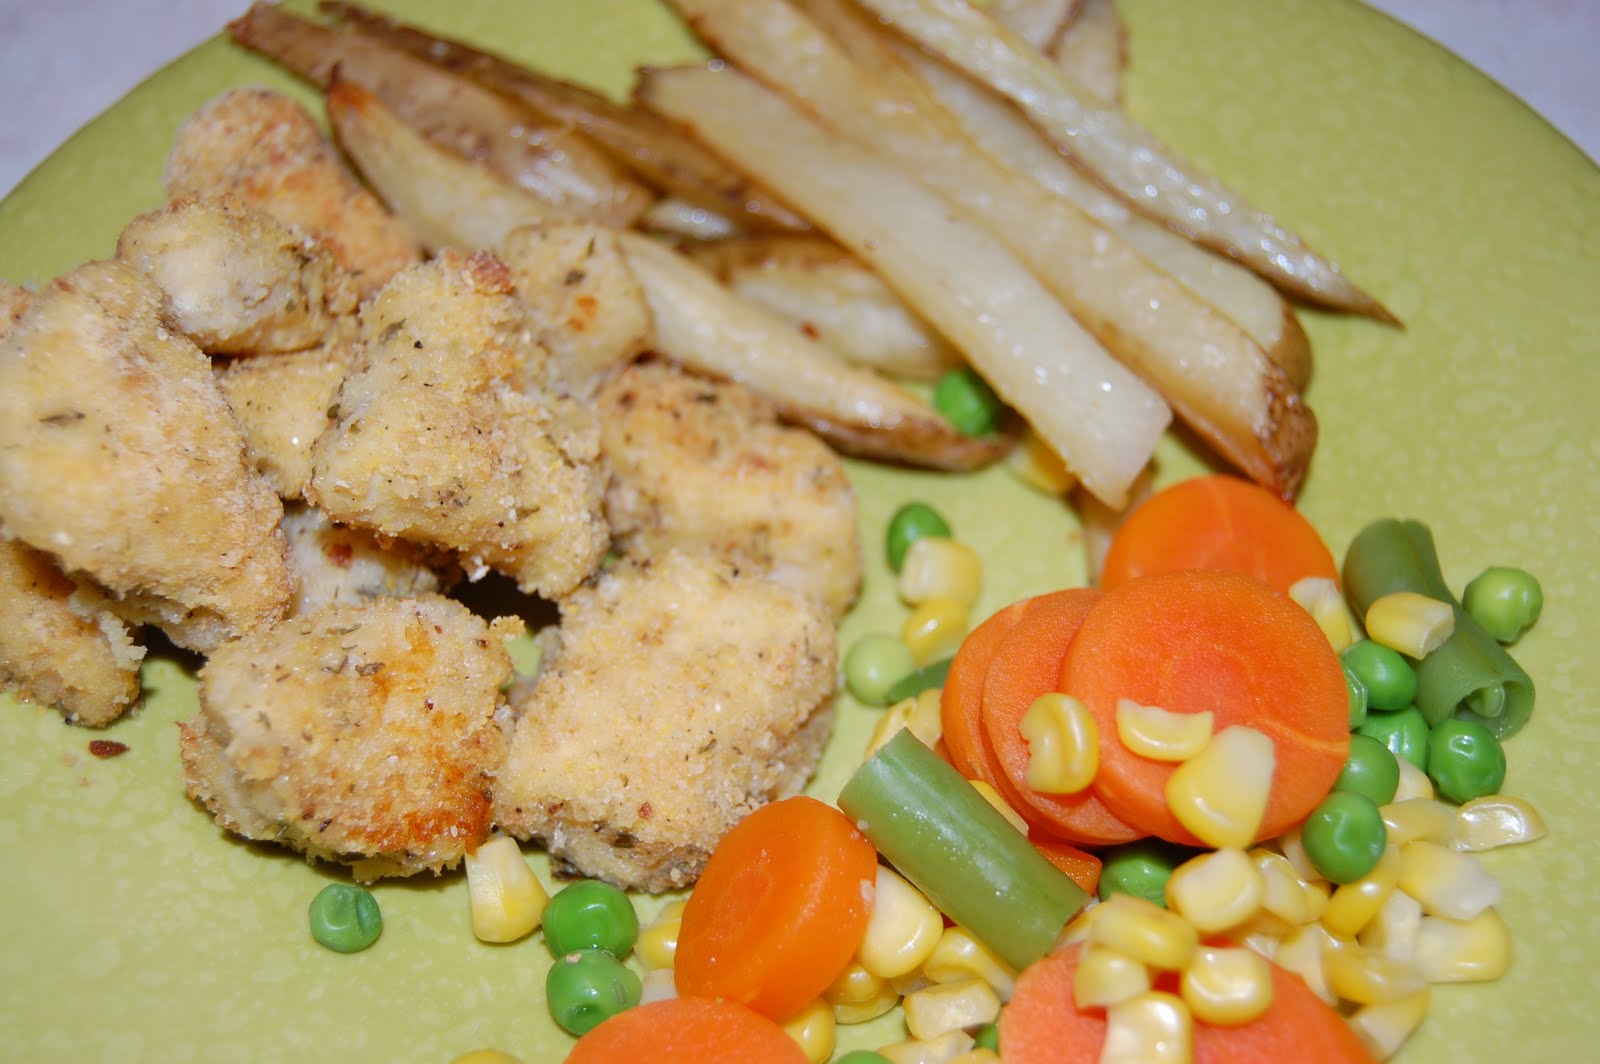
Homemade Chicken Nuggets and French Fries

My son would eat at Chick-Fil-A every day if he could... so I found a recipe to make my own BAKED chicken nuggets to make my six year old happy. I cut this recipe out of a magazine, but you can find it here.


Cornmeal Oven-fried Chicken

1/2 c. dry breadcrumbs (I just used the Italian seasoned ones because that's what I had on hand)

1/2 c. cornmeal

1/3 c. grated Parmesan cheese

4 tsp. dried parsley flakes

3/4 tsp. garlic powder

1/2 tsp. salt

1/2 tsp. pepper

1/2 tsp. onion powder

1/2 tsp. dried thyme

1/2 c. buttermilk

3 to 4 pounds of chicken breast, cut up

1 T. butter, melted

In a large resealable plastic bag, combine the first 9 ingredients. Place buttermilk in a shallow bowl. Dip chicken in buttermilk, then add chicken to bag, a few pieces at a time, shake to coat.

Place on cookie sheet coated with cooking spray. Bake at 375 for 10 minutes; drizzle with butter. Bake 30 minutes longer or until juices run clear.

I also made a honey mustard dipping sauce to go along with them.

Honey-Mustard Dipping Sauce

1/2 c. Djon mustard

1/4 c. mayonnaise

1/8 c. honey

Stir together all ingredients and chill.

I also made my own french fries by peeling and cutting potatoes. I then throw them in a plastic bag and pour a little olive oil to coat and then add seasoned salt. I bake them at at least 400 degrees. 450 if I'm in a hurry. The french fries in the above picture had a little too much olive oil and I like my french fries more crispy than that. (I must have been in a hurry to put dinner on the table that night.....)

This meal puts a smile on my six year olds face. Take that, Chick-Fil-A!

December 18, 2010

Cranberry Lime Drink

I love a yummy drink recipe. This is perfect for the holidays! It is a little tart, fresh, and very tasty!

I got the recipe out of Southern Living's magazine, you can see it here.

They call it a punch recipe, but I wouldn't categorize it as a punch, it's more of a lemonade-y, club soda-y kind of drink. I changed the recipe a little; not adding the alcohol and I used regular limes instead of key limes.

2 c. fresh cranberries
1 c. sugar
1 c. water

1/2 c. fresh lime juice (about 2 1/2 limes)
5-6 c. chilled club soda

Combine cranberries, sugar, and water in a saucepan. Cook over medium heat, stirring occasionally, 8 minutes or until cranberries begin to pop. (Once, I actually cooked it too long and ended up getting cranberry pulp in my drink. You just want the syrup.) Pour mixture through wire-mesh strainer into a large pitcher. Cool completely. Stir in chilled club soda, and lime juice.

So yummy.

I need more.

December 15, 2010

Spritz Cookies


For the next few days, I'll post a few foods you should make to add to your holiday table...

This is definitely one of them.

My husband introduced these to me after we got married, they are one of his family's favorites, and now they are one of mine!!

Spritz Cookie Recipe

1 c. butter
2/3 c. sugar
1 egg
1 tsp. almond extract
2 1/4 c. flour
1/2 tsp. baking powder
Splash of milk

Cream butter and sugar together. Add egg and mix. Add almond extract, and then dry ingredients. I then add just a little bit of milk to bring the dough together. NOT MUCH, just a little splash or two. (Don't you love my technical terms...) You kind of have to bring the dough together with your hands. Then you take the dough and cram it into your cookie gun, and make whatever shapes you want.

Bake at 375 degrees for 8 minutes.

I color sugar with food coloring, or you could buy sprinkles. Trevan sprinkled the ones above, so he was a little heavy on the red sprinkles... We like to decorate ours with red hots. (Bake them with red hots on them) Especially the wreath shapes, to make it look like berries. A spritz cookie and a red hot equal the perfect combination!

Santa will appreciate these cookies. I promise.

November 29, 2010

I was not thankful for pie

I love trying new recipes. 'Love,' probably being an understatement.

There are about twenty pumpkin dessert recipes I had cut out of magazines and put in my 'TO TRY' cookbook, so this year I wanted to try I few... I chose six, and then narrowed it down to four. I was so excited, these pies looked so yummy. However, and unfortunately, I was unimpressed. The pies all turned out well, but I would have rather just made my normal pumpkin cheesecake.

Here is the pie rundown:

PIE #1: Triple Chocolate Pumpkin Pie - Recipe HERE


The only thing I did different than the recipe was cover the top with melted chocolate instead of drizzling...

Dear Martha,

I love you... but, did you even try this recipe before putting it in your magazine????

PIE #2: Sweet Potato Pie with Marshmallow Meringue (from this years Southern Living November magazine) - Recipe HERE


Now, this pie wasn't a total loss. It tasted fine, just different. It was a lemony - sweet potato pie. However, I LOVED the meringue, and will probably substitute this meringue for any other meringue in the future.

PIE #3: Pumpkin Chiffon Pie - Similar Recipe HERE


This pie was okay too, it just didn't WOW me. I cut this recipe out in 2004 so, I couldn't find the exact recipe online. The one I posted is similar except the recipe I used wasn't low fat, mine had a cream cheese layer underneath the pumpkin chiffon layer, and I used whipping cream instead of Cool Whip.

PIE #4: Eggnog Pumpkin Pie - Recipe HERE


This recipe I cut out in 2008 from Taste of Home. I liked this pie the best. This pie also made my house smell so yummy when it was baking in the oven! This recipe won't get thrown in the trash like the chocolate, and chiffon one, but it probably won't be a Thanksgiving regular.

I do love trying new recipes, but it's so sad when they end up not meeting your expectations. But, that's okay; four recipes down, one hundred bajillion million to go.

September 16, 2010

Creamy Lemon Supreme


A friend had us over for dinner and made this for dessert, and I had to have the recipe. I finally made it a few weekends ago for a family reunion picnic. The recipe is from one of her cookbooks, I'm sorry I don't know which one... My notes and changes will be italics.

CRUST
12 lemon creme-filled sandwich cookies, finely chopped (1 1/2 cups)
3 T. butter or margarine melted
1 lemon

(My friend used a graham cracker crust, I did the cookies. Tasted good either way. The graham cracker crust does provide a nice contrast. I would double the cookies and butter though, I didn't think 12 were enough. I LOVE the lemons on the side, it just adds a nice touch, and that is where you slice your slices. When my friend made it she just used a ready made graham cracker crust in a pie plate, so if you still want the taste without the fuss that is a good option.)

Lightly spray springform pan with nonstick cooking spray. For crust, crush cookies and mix with melted butter. Press into bottom of the pan. Cut six thin slices from lemon, cut each slice in half. Place lemon halves against inside collar of pan with cut side touching crust. Refrigerate while preparing filling.

FILLING
2 lemons
1 (2.9 oz.) pkg. of lemon cook and serve pudding and pie filling (not instant)
1/2 c. sugar
2 c. water, divided
2 egg yolks
1 T. butter or margarine (I always us butter for any baking)
2 (8 oz.) pkgs. softened cream cheese
1/2 c. powdered sugar
1 container (8 oz.) frozen cool whip, thawed and divided (I never use this in any recipe either. I always sub whipping cream. So, for this I whipped 1 cup of whipping cream - which makes 2 cups needed for the recipe. But, you'll need more in addition for garnish on top)

Zest lemons to measure 1 1/2 tsp. zest. Juice lemons to measure 1/4 c. of juice. Combine pudding, sugar, 1/4 c. water and egg yolks in small saucepan; stir until blended. Stir in remaining 1 3/4 c. water. Cook over medium heat, stirring constantly until mixture comes to a full boil; remove from heat. Set aside 1/2 c. of the pudding; cool slightly. Whisk butter and lemon juice into remaining pudding in saucepan; cool 15 minutes, stirring twice.

In large mixing bowl, combine cream cheese and powdered sugar; mix well. Whisk in reserved 1/2 c. lemon pudding and 1 tsp. lemon zest. Fold in whipped topping; spread over crust.

Stir remaining lemon pudding mixture and spoon evenly over cream cheese filling, spreading gently. Refrigerate at least 6 hours.

Run paring knife around sides of dessert; release collar from pan. Garnish with whipped topping and lemon zest.

Serves 12.

April 1, 2010

Crock Pot Lasagna


I was looking through a crock pot cookbook, and saw some recipes for crock pot lasagna. I thought I would try it out, but with my own lasagna recipe. My cut piece of lasagna picture up top doesn't look really great, and this is why: I was layering all of my lasagna in the crock pot while talking on the phone with my sister, I put the cheese on top, and all of a sudden I realized I hadn't added any of my meat yet!! So, I tried to lift up pieces, and layers, and put the meat in, but it didn't work very well in making a pretty dish... Oh well, it still tasted DELICIOUS! Husband and kids devoured it. My husband even thought I made the noodles - that's how yummy they turned out!

Really, the only difference in this lasagna and me making it the regular way is I didn't cook the noodles ahead of time to speed up the cooking time, and I didn't have to wait around for lasagna in the oven, I could turn the crock pot on and leave.

**  Update - I now use more cheese than this:  Italian cheese and Mozzarella cheese (usually 16 oz.)

Crock Pot Lasagna:
1 lb. ground beef (browned)
1 lb. Italian sausage (browned)
15 oz. low fat ricotta cheese
12 oz. low fat cottage cheese
8 oz. Italian blend shredded cheese (or whatever kind of cheese you want to use)
1 T. dried parsley (you can use fresh to taste)
1 clove of garlic (crushed)
1 16oz. lasagna noodles (uncooked)
1 2lb 13 oz. jar of spaghetti sauce (I used Ragu Garden Combo., or make your own)

1. Combine your browned meats. Set aside.
2. Mix together the next 5 ingredients, reserving a good handful of cheese to sprinkle over the top of the lasagna. (I have also in the past, sprinkled in basil and oregano into the cheese mixture, but I didn't do it this time for some reason. I think it just depends on how flavorful your spaghetti sauce is to what spices you add to your cheese mixture.)
3. Grease your crock pot.
4. Begin layering (But, not while you are on the phone...). Put about one cup of sauce in the bottom of your crock pot, followed by enough lasagna noodles to make one layer to cover the sauce, then spread a portion cheese mixture, then sprinkle a portion of meat mixture, then cover with a portion of sauce. Repeat, until all ingredients are used, ending with sauce on top covered with your reserved cheese.
5. Cook on high for 3 hours, or low for 5 hours, or until noodles are soft.

*** You could also add layers of mushrooms, or cooked spinach, or zucchini, and carrots if you want to make a vegetable lasagna instead of meat. Or for the ultimate lasagna, add everything!

Enjoy!!

March 23, 2010

Leftover Makeovers

I try to plan out my meals at the beginning of the week. I also try to plan my meals around what I already have in my pantry and refrigerator/freezer. I try to buy what is on sale and keep my pantry/fridge stocked with staples that I can cook meals from. On weeks I am trying to save money, or I don't have a lot of money, I try to (or am forced to) cook solely from the stock in my pantry/fridge. I also try to make a few meals out of one meal. I love leftovers, but my husband gets tired of eating them, and so does my daughter. So, I plan meals so I can makeover my leftovers.

For example, dinner at my house last week (carried over into yesterday, and lunch for today and tomorrow):

Meal #1: A whole chicken in the crock pot served with vegetables I have on hand.
Meal #2: Leftover Chicken made into a Chicken Broccoli casserole
Meal #3: Leftover Chicken made into Barbecue Chicken Pizza (I was going to make chicken salad, but John requested the pizza)
Meal #4: A big ol' pot of home made Chili
Meal #5: Leftover Chili made into Chili Cheese Cornbread Bake

And, usually we have leftovers from the leftover makeover meals. Now, I know because we have a small family we can make our meals stretch a little farther, but if you have a larger family, you can still do the same thing if you plan ahead to make larger quantities for the first meal. Those are all meals I can make with the staples I have on hand, and all inexpensive meals. Figure out what your staples are and you can do the same thing based on those. Another cheap meal is spaghetti; make a large amount, and you can turn leftovers into baked spaghetti (bake your leftover spaghetti with cheese on top), or spaghetti pie (basically lasagna with spaghetti noodles). This really helps stretch my grocery budget when I need it, and makes it really easy when I am too tired to cook, and I can just throw stuff together!


Broccoli Chicken Casserole: Reserve and strain broth from your whole chicken. In a casserole dish, add about 2 c. of shredded chicken, 1 c. of reserved broth, 1 small bag of steam fresh broccoli, 1 can cream of chicken soup, 1/2 - 1 c. sour cream, about 1 c. of cheddar cheese, 2 c. of rice or noodles, and a little bit of milk to make desired consistency. Cook at 350 degrees until bubbly and heated through (about 30 minutes). You could also add stuffing (Stove Top or homemade breadcrumbs, whatever you have on hand) on top if desired.
Chili Cheese Cornbread Bake: Put leftover chili in the bottom of a casserole dish (I use my cast iron skillet), sprinkle 1-2 c. shredded cheddar cheese over top. Make your favorite corn bread recipe, or if you are really tired, I guess you could use a cornbread mix, like Jiffy, or something. Pour your cornbread batter over top of your chili and cheese. Bake casserole at the same temperature and for the same length of time as your cornbread recipe. (Warning: If your cornbread recipe is baked at 350 degrees, I would use a higher temperature, especially if you are using a cast iron skillet, or it is going to take a long time to get the middle cooked.)
One of my biggest budget and time saver tips: Almost five years ago, I discovered the beauty of cooking with whole chickens. I stock up when they go on sale for 47, 59, or 69 cents a pound. When I cook them, I stick the whole chicken in the crock pot and can definitely make more than one meal with a one chicken. You really can't beat the price and the time it saves you. It's so easy, and crock pot cooked chicken is always so moist and yummy; no hard, dried up, or fatty pieces of gristle attached to your chicken in your foods!

March 15, 2010

Make ahead Biscuit Recipe

Pin It

Technically, this is just my regular biscuit recipe, but a few weeks ago I thought about making them the night before and baking them in the morning, and tried it and it turned out!

I grew up watching my grandma and my dad make biscuits. (Mostly, I would just watch so I could snitch the dough to eat! I would eat biscuit dough over cookie dough any day! I love it!) Even though I watched them make biscuits, getting a recipe out of them is useless. I come from a family of cooks that use the word, "handful" as a term of measurement. (This is my Grandma giving me a recipe, "put your flour in until it looks right, add your milk (no measurements mind you), mix it up until it looks right," etc. etc.) I'm like that too, but I'm really making an effort to write down all my recipes with measurements so my children won't be bugged one day when they try to cook my food.

I decided to come up with my own biscuit recipe when John and I went to make biscuits one morning and found three recipes written down from my dad, three recipes that were ALL DIFFERENT for the same biscuit! Most biscuit recipes are basically the same with a few little preference changes. I personally think mine are the most delicious, of course.

Holly's Biscuit Recipe:

2 c. flour
3/4 tsp. salt (If I use salted butter, I don't always add the salt)
3 tsp. baking powder
1/2 c. butter
1 c. plus 1 T. buttermilk (do not use low fat buttermilk; you can, but it does make a difference!)

1.  Mix dry ingredients together. Cut in butter until the size of oatmeal or a little larger.

2.  Make a hole in your flour mixture (or volcano as my son says) and pour in your buttermilk. (A method I learned from watching my dad.) Mix until dough comes together.

3.  Knead your dough together a little bit with your hands.

4.  Roll or spread out the dough with your hands on a floured surface. Cut to desired sizes (Make sure they are pretty thick!) (If you don't have a biscuit cutter - my family often uses the tops glasses to cut biscuits).

5.  Place biscuits, touching, on greased pan. TOUCHING.  My husband had a hard time with this when he first starting making this recipe.  They rise taller if they are touching.  (If you are making these to bake the next day, cover and place in your fridge.)

6.  Bake at 425 degrees for about 10 minutes or until very lightly browned.

This recipe makes about 10 biscuits, depending on how thick you cut out your biscuits, or how much dough you ate! :)

March 10, 2010

Make ahead crepes recipe

Amongst many of my family members, nieces and nephews included, crepes is a favorite , and highly requested breakfast item. I think my son asked for crepes for breakfast or dinner for almost a week before we finally made them last week. He even pronounces them the French way, though not on purpose.

I introduced my family's crepes to John after we got married, but he has since mastered the art, and is always in charge of the crepe making while I make the fruity middle. We not only eat these for breakfast, but we make them for dessert as well filling them with milk chocolate and fresh strawberries, and nutella and banana. Or chocolate with banana, and nutella with strawberries. Or, if you are John, you combine all those things together. I've also had the lemon juice and powdered sugar way as well, though still tasty, but to me, rather bland compared with the fruity middles.

This is a recipe that you can prepare ahead of time. You can make the batter a day ahead, whip the whipping cream a day ahead, and prepare the fruity middle a day ahead. Then, you only have to warm up your fruit mixture before serving.

I could eat 10 of these crepes by myself, but I try to limit myself to three...

Yummy Crepe Recipe:

1 1/2 c. flour
1/2 tsp. baking powder
1 T. sugar
1/2 tsp. salt
2 cups of milk
1/2 tsp. vanilla
2 T. melted butter
2 eggs

For the batter: Put the dry ingredients into a blender and mix well. Add wet ingredients, blend until mixed and smooth.


We always have helpers in the kitchen...

We use our griddle to make crepes on. Grease your griddle or pan. Pour desired size batter and cook. Knowing when your crepe is ready to flip is like knowing when your pancakes are ready to flip; the very outside gets a little bubbly, and the outsides start to change color, getting a little darker like the picture shows below. Then flip. You don't want these brown, so watch carefully, and take them off the heat once they have firmed up in the middle.

For the fruit filling: (You can choose any fruit you like, my favorite to use is strawberry) In a saucepan combine one regular sized bag of frozen strawberries, 1 1/2 T. corn starch, and 1/2 c. sugar. Cook over medium heat until thick. If using whole strawberries, take a potato masher and mash through the strawberries once they are soft. Really, my husband would sweeten his strawberries even more, so sweeten the strawberries to your taste.

Top with sweetened whipped cream.

This recipe makes about 12 crepes (using about 3/4 c. batter per crepe)

John has also subbed in a portion of white wheat flour to the batter. I didn't really like it, but if you are trying to be healthier... My feelings were if I wanted a heartier crepe, we could have just made wheat pancakes.

Enjoy! These are so yummy! (We even have them for dinner sometimes...)

March 8, 2010

Make ahead bran muffin recipe


I know what some of you are thinking... Bran muffins? Gross! So, not the case! Paired with a little Brummel & Brown I can't eat a ton of these things. Not to mention, your kids will eat a ton of these things!! My sister gave me this recipe a long time ago, it's a favorite of her family's and mine too!

The great thing about this recipe is they are not only good, but it makes a ton (you could half the recipe), and you store the batter in your fridge and make them at your leisure! So, on those mornings you really don't feel like doing anything; you open your fridge, take out the bowl with the muffin batter in it, scoop some in some muffin tins, and breakfast is served!!

Bran Muffins:

2 c. boiling water
2 c. All Bran
4 eggs
2 c. brown sugar
1 c. oil
5 c. flour
5 tsp. baking soda
1 tsp. salt
4 c. buttermilk
4 c. Bran flakes

1. Add All Bran to boiling water, set aside to soak.
2. Beat eggs, brown sugar, and oil. Add in soaked All Bran mixture and beat to combine.
3. Beat in remaining ingredients.
4. Preheat oven to 375.
5. Grease muffin tins or liners
6. Fill muffin tins 2/3 - 3/4 full, depending on how big you want your muffins to be.
7. Bake for 12-15 minutes or until toothpick test comes out clean.
8. Store remaining batter in a covered bowl in your fridge for up to at least one week.

(This makes a very large bowl; you could totally cut the recipe in half, but I like to have the extras in my fridge! Also, my sister will sometimes use all All Bran instead of using that and Bran Flakes. You could do the same with just bran flakes as well. The All Bran way is going to give you a darker muffin, and the Bran Flake way will give you a lighter muffin. Either way, delicious!)

March 5, 2010

Red Lobster Cheddar Biscuits Copy Cat Recipe


I probably made Cheddar biscuits for the first time about seven years ago. The recipe I used to use involved using Bisquick, and I don't ever buy that, so this time I wanted to try making them using my own biscuit recipe. Turned out yummy!

Red Lobster Cheddar Biscuits Copy Cat Recipe:

2 c. flour
3 tsp. baking powder
3/4 tsp. salt
1/2 c. butter
1 c. buttermilk
1 c. cheddar cheese

2 T. butter
1/4 tsp. dried parsley (crushed fine)
1/4 tsp. garlic powder

Mix first three ingredients together. Cut in butter using a pastry blender, fork, or knives until dough is oatmeal sized. Stir in liquid and cheese. Knead to bring together the dough (you won't have to do very much). Roll out and cut desired rounds at least 1/2 inch thick. Place on greased pan with the sides of the biscuits touching. Bake at 425 for 12 minutes until lightly browned. Melt butter, parsley, and garlic powder and brush on cooked biscuits.


If you want thick, fluffy biscuits you have to cut them thick. You also want your biscuits to be touching because it forces them to raise up instead of out.


See? No need to go to Red Lobster anymore! Enjoy!!

March 4, 2010

Girl Scout Thin Mint Cookie Copy Cat Recipe

I thought I would try these for my husband. He loves the thin mint cookies. I personally would rather buy the cookies in the picture below, because I think they are better and you can buy them all year.

The recipe I adapted is found HERE. This recipe was pretty close. The ones that tasted most like the thin mints were the thinnest cookies. So, if you make this recipe make sure your cookies are thin. The original recipe calls for shortening, but I don't cook with that anymore and always substitute with equal amounts of butter. You can see the other adjustments I made and my tips in my italicized notes in the recipe. This was an easy recipe, the part that takes the longest is dipping the cookies in chocolate.

Girl Scout Thin Mint Cookie Copy Cat Recipe:

For the cookie wafers:

1 (18.25 oz.) package of fudge cake mix (I used Betty Crocker)
3 T. butter
1/2 c. cake flour, measured then sifted
1 egg
5 T. water

For the coating:

2 (12 oz. bags) semi-sweet chocolate chips (I use Ghiradelli)
3/4 tsp. peppermint extract (I used less chocolate chips than the original recipe and still used the amount of extract it called for. If I make these again, I would add more peppermint. When the chocolate is melted, taste it, if it needs more peppermint to you, add more. Just be careful you don't end up making chocolate tasting toothpaste...)

1. Combine the cookie ingredients in a large bowl, and beat, adding the water a little bit at a time until the dough forms. (Next time I make these I'm going to add some mint to the dough too.)

2. (I added this step so I wouldn't have to roll out the dough and cut it, but if you want to do that refer to the original recipe.) Shape the dough into a rough roll and cover with saran wrap leaving extra saran wrap on either side. Roll to make a thin roll, thin enough to fit into a cardboard paper towel roll. You will have extra dough hanging out on both sides if you only use one. So, divide your dough if you have two of them. Chill for at least 2 hours.

3. Preheat oven to 350 degrees, and grease cookie sheets.

4. After your dough is chilled, work with small portions of your dough at a time, to make sure the dough is cold. With a very sharp knife, slice thin slices and place them on your cookie sheet. (You may have to reshape some of your slices to circles if your dough is really soft.)

5. Bake for 10 minutes.

6. Remove the wafers from the oven and cool completely.

7. Combine chocolate chips with peppermint extract and melt over low heat in a pot on the stove, or in the microwave. Stirring often.

8. Dip cooled wafers in chocolate and let dry on wax paper. (I dipped the cookie top down, then flipped it over with a fork and shook it lightly over the pot to remove excess chocolate.)

9. I made about 60 cookies, the original recipe said it makes 108; but, mine were larger, and some of mine were thicker than they should have been. Enjoy!
Related Posts Plugin for WordPress, Blogger...