Showing posts with label DIY Tutorial. Show all posts

February 4, 2021

Show the love


Honestly, today as I put out these Valentine envelopes I made 11(!) years ago, I really wasn't feeling the love... 


When I made these, I had grand ideas of family members leaving kind things for each other. I thought John and I would leave notes or treats for the kids every day during the month of February.  I'm just a few days late putting them out, and I'm honestly not feeling very generous in giving things to my bickering, loud, squealing children right now.  (AND, I'm a little behind because Everett and Bailee still don't have one. I'll get right on that...)

Though, when we sat down to dinner tonight after a less than thrilling day, Everett said, "Mom, there's a card and candy in your envelope." He had written a cute note on an index card and found some leftover Christmas candy and put it in my envelope.  So, he's sweet, and well, I guess that's the whole point of them.  In the past, when John left things in the envelope for all of us, he would always sign them "From, Romeo."  The kids always got a big kick out of it and they actually thought there was a Valentine's elf named, Romeo. 

There's a link to my tutorial for these in the first sentence of this post.  Or, if you don't want to make some, you can order some to set out for your family.  There are some fun ones on Amazon that you can order and they can double as a craft project for your kids!  I figured since a lot of kids still aren't in school, it would be extra fun for families to do this.  


Here's some super cute ideas I found on Amazon:

Here's some big felt envelopes already made!


How cute would these be with names added to them?!  You could put them on kids doors, or add ribbon like mine and hang them over chairs. 


Oh, my word! How cute would this be?!? Each family member can have an envelope and it would double as decor! Genius! 


Or, you can buy the whole kit that comes with Valentine's and the box! One stop shop!

Happy love month!  If you've got good ideas of how your family shows the love during February please share!

December 28, 2019

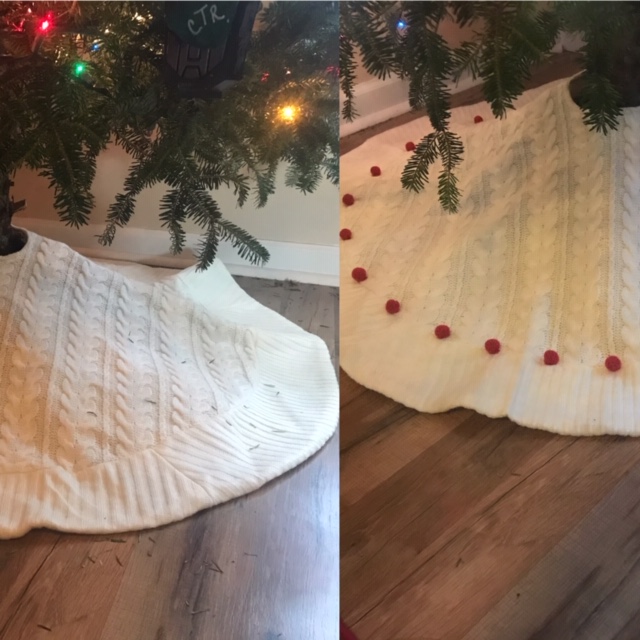
My Tree Skirt Project

Before/After

I got a new tree skirt this year to match my stockings.  However, I just wanted to add a little bit of red to it.  I can't knit or crochet, but I really wanted some popcorn thingys on it to match my stockings.  Well, I came up with my own solution and did it yesterday! I love it so much!!


I couldn't get a complete before picture, because I was just too excited to sew on my first pom pom ball.


How I did it:

I wanted my pom poms to be the same texture as my tree skirt, so I didn't want to make poofy yarn pom poms.  I had some sleeves of a red sweater from my craft room that I used to make re-purposed stockings years ago (thankfully not in the storage unit).  They matched perfectly! All I needed was, thread, scissors, and I used those packaging pillow things as the stuffing of my pom poms.  Reduce, reuse, recycle - bonus!


I used a fourth of each square in one pom pom

I used a spool of thread for the size of my circles.

I rolled up the plastic, placed it in the middle of the circle, and stitched around the outside, then pulled the stitch closed to form my pom pom. 

Then, I sewed each pom pom on the tree skirt. 

If you can't knit or crochet, now you can make your own pom poms to add texture to a fun project!

January 20, 2014

Mini Graduation Cap Headband Tutorial

In December, a few friends and I went out to dinner to celebrate one of our friends getting her degree. I wanted to make her a big graduation cap, but that day I ran out of time and motivation so I made a little mini graduation cap headband instead! I loved how it turned out, and it looked super cute on her!

Pin It


Mini Graduation Cap Headband Tutorial
(This is not an exact measurement kind of tutorial...) 

1.  I cut out a square (roughly) piece of cardboard, and then a more rectangular piece of black felt.


2.  I attached a button to the center of the black felt.


3.  I hot glued, the felt onto the cardboard to cover it and make the top of the cap.


4.  I then cut the base of the cap - I cut out a thin strip of cardboard and then enough felt to fold around it. 


5.  I sewed up the felt, then turned it right side out and slid the cardboard base into it.


6.  I then sewed the ends of the base together by hand.


7.  I attached the base of the cap to a headband using hot glue.


8.  Then I added the tassel, and my daughter modeled it for me (unwillingly) to make sure it would work.


This is would be so fun for a graduation party!!

December 10, 2013

Copy Cat Snow Globe - Tutorial

Pin It

I've seen the snow globes that you can make out of a mason jar, but I had never seen them like this until I saw it on a friend's Instagram widget on her blog that she took at some festival or something.  Immediately I knew we would be making these for family night, and we did!  (Trust me, our family home evening nights are NEVER this involved!)

I knew my kids would enjoy shopping for and picking out their little figures.  I had to reign in my nine year old son because he wanted to put everything and the kitchen sink in his.  He had to have birds in his trees even though they weren't going to be "to scale."  They really enjoyed it, and fought over the snow in the store, of course!

This is a cheap project if you have bowls/containers already lying around your house!


I love that each globe represents each of my kids so well...

We had something else picked out for my three year old, but when I saw this train I knew I had to do it!  He LOVES it.  He was a bit sad for a second when he realized he wasn't going to be able to pull the train around anymore after being put inside the snow globe.. 

I realized this morning that this is so appropriate for my six year old daughter - always picking on her brothers (everyone)!

This represents my nine year old, happy go lucky!


Snow Globe Tutorial

Fish bowl (or any clear container - could be plastic for the little ones)
Snow
Foam board
Hot glue gun (and glue sticks!)
Little figurines and trees (Now is a good time to get them - they are 60%, but slim pickings!)
Puffy Paint (I wasn't sure they even made this anymore, but they do!)

1.  Trace the opening of your container - then cut it out inside the line a bit. You kind of have to play with this.


2.  Glue your figures to the foam board.


3.  Put a pile of snow in the middle of your foam board, kind of piled up in the center.


4.  Put hot glue around the rim of your container.


5.  This picture is kind of misleading because first I actually put the bowl on top of the foam board while the foam board is on the counter and press to make a seal, then if I have to adjust any I pick it up and do so.  That's what the picture shows below. I use hot glue to seal up any cracks in between the foam board and the container.


6.  Then, I put the puffy paint (snow) around the bottom and any foam board still visible.


7.  Leave upside down to dry.


8.  Three drying snow globes!


9.  After dried, shake and enjoy! 


**  I wasn't sure I was going to like this snow once I opened it, but I like how some sticks to the container making it look like it is always flurrying inside!!  Love!

November 14, 2013

Homemade Pumpkin Puree


Pin It


You guys know I'm crazy.  Well, this might be crazier than the time I went shopping the day after I came home from the hospital when Jonah was born...  This was a 9 hour project!!  By myself, while taking care of my kids!!!!!!!  But, I'm not going to lie, on days like that I wish I had a farm and was Amish (but with electricity and such....)  Oh, the simpler life...

Anyway, the day before Halloween I took my kids to the Pumpkin Patch to pick out their pumpkins to carve.  (Better late than never, right???)  The lady was super nice and I got a steal for three pumpkins (I thought I would have to pay more!).  I was chatting with her about what they do with the pumpkins after Halloween and she said they just throw them away!

My mouth probably hit the ground!  She told me if I came back the next night after six I could just have whatever I wanted.  I probably dreamed about pumpkins that night and could not wait until the next evening. Who cared about candy??!!  I was going to make pumpkin puree!!!

I went on Halloween night to get my pumpkins (of course after I took the obligatory photos of my own trick or treat-ers, put candy on my door step, and agreed to meet up with my husband and kids after getting the pumpkins only five minutes down the road).  There were two men there (surrounded by the aroma of alcohol I might add...)  getting free pumpkins and such for their chickens and hogs.  They were a little to chatty and I loaded up my trunk with pumpkins as fast as I could!  The lady was so nice and I told her if she was there when they sold Christmas trees (same farmer uses same lot) I would bring her some pumpkin goodies in December!

I had originally thought I would can it, but turns out the FDA says not to do that.  In fact, you shouldn't even eat pumpkin butter that was canned.  (Pumpkin puree you can can pumpkin chunks if you pressure cook the crazy out of it!)  Anyway, I was a little bummed when I read about it (and researched it a lot just to be sure!).  Turns out I could have asked my Grandma, because she told me when she was young she canned pumpkin puree and her aunt told her it would go bad, and it did!

So, I got 21 pumpkins and had to throw away two by the time I was able to get to them.  I still have two more to do actually that are just sitting in my kitchen floor...  I just can't bring myself to do them.

You guys... there was pumpkin from one spot of my kitchen to the other - pumpkin was absolutely, insanely  everywhere!!  It was such a ginormous mess!

17 pumpkins made 38 - 2 cup bags full for my freezer!  Can you even believe I almost bought some canned pumpkin at the store today knowing that?  It was only 89 cents a can though!! I did refrain however.

Anyway, I use the puree as baby food for Everett, and I've already made some pumpkin chocolate chip cookies.  However, cooking with this pumpkin puree doesn't give the cookies that darker color that canned pumpkins give your cookies.  But, they were still delicious!!!

Can you even believe all that meat??  It would have just been thrown away, I can't even believe it!

Okay, so there are a few ways to make pumpkin puree.  I did most of them.  I cooked some in the oven (Please use a cookie tray under yours....  just a tip...).


Then peeled off the peeling, then had to cook some a little more on the stove, then puree...  I did both ways since I was doing so much and my pots could only hold so much at a time.  My preferred method is below. 

You guys, that was only a VERY SMALL portion of all the pumpkin...

Homemade Pumpkin Puree How To

1.  Cut your pumpkin in half or really however you want to.  Clean out the inside guts and seeds.

2.  Peel the skin off of your pumpkin.  Cut your pumpkin into pieces.  (like how you make mashed potatoes)

3.  Put just a little bit of water in a large stockpot.  Put pumpkin in pot and cover with lid.

4.  Boil and steam until pumpkin is super soft and well cooked.

5.  Drain liquid.

6.  Puree pumpkin pieces. (I used my immersion blender)

7.  Line strainers with paper towels, pour in pumpkin puree, and allow to drain.  Repeat to get more liquid out.  I use fresh paper towels each time.

8.  Allow to cool, then put in bags or containers to freeze! 

Pumpkin before drained

Getting the liquid off

Look at all that pumpkin puree ready to be bagged!!!! 

Some of the bags... 
I actually overworked my small chest freezer by putting too much in at a time... Now I know for next time!!

Yay!! I can make pumpkin whatever without having to run to the store!!!!

April 29, 2013

You guys, I made TAMALES!!!!!!

Pin It
I was so excited to eat these, I BARELY got a picture... 

I kept saying this over and over, "I made tamales!!"  I also told every member of my family that I talked to on the phone, "Guess what? I made tamales!"  I'm easy to please like that.  I think I can check this off my bucket list!  But, don't get me wrong, I will be making these for the rest of my life!! 

I love tamales!!!  Over a decade ago, I helped someone make tamales for my family.  She didn't speak any English, and my mom and I were helping her.   She used shortening, and while mom and I picked every piece of fat off the pork we were using she just reached over and grabbed the pork, fat and all!  Gross!  So, I loved being able to make my own without any fat on the chicken and no lard in the dough part!  I did almost jump ship when I started going through the corn husks to wash and found a super long dark hair and little buggies, etc...  If you know me and my issues, preservering through that is a big deal...  I did throw away quite a few corn husks though.... Now I know never to trust someone else to make these because what if they didn't wash them good enough!?!?!  Yeah, I have issues.  Mine got washed a few times... 

I read lots of recipes to see how to make these and roll these, etc.  I had to be a little creative with making them because I don't have a steamer that goes inside a pot (must get one!!!), so you can see my pictures below.  I did change from the original recipe a tiny little bit, so the recipe below has my changes.  I'm no expert, so don't judge me if I'm not doing a part that is authentic or something, but this worked for me. 

This is a time intensive meal, but worth it!  You could also make the chicken part ahead of time and let it sit in your fridge until you are ready to use it, to cut back on your meal preparation for one day. 

Something that made me love tamales even more??  My kids loved them too!!!


Healthier Chicken Tamales
Recipe from HERE

Ingredients
 
Wrap
  • 18 corn husks (I actually used a lot more than this.... but I didn't count...sorry.)
Filling
  • 3 1/2 cups boiled and shredded chicken
  • 1/3 onion (finely chopped)
Filling Sauce
  • 1 1/3 cup water (from boiling the chicken)
  • 1 teaspoon chicken bouillon
  • 1 teaspoon lime juice
  • 4 Tablespoons Taco seasoning
  • 1 1/2 Tablespoons corn starch
  • 1 Tablespoon cold water
Dough
  • 4 cups masa (no salt added)
  • 6 teaspoons canola oil
  • 4 cups hot water
  • 2 teaspoons salt
  • 1 teaspoon garlic powder
 
Preparation
  1. Before starting, (I washed my corn husks first!!!!! then did the next part)  place your corn husks in water and allow them to soak for at least 2 hours, but a lot of recipes I looked up had them soak overnight. Once they are completely soaked and pliable, completely rinse them (again...). 
Filling
  1. Cook enough chicken breasts (It took 2-3 large breasts) to render 3 1/2 cups of shredded chicken. (You can shred it with a fork, or chop it in a food processor for smaller pieces).
  2. Add in the finely chopped onion and mix well.
Filling Sauce
  1. In a small saucepan, put the 1 cup of water from the boiled chicken, the bouillon, lime juice and the taco seasoning together and stir over a low heat.
  2. Dissolve the cornstarch in the cold water, then add that to the saucepan and stir until it thickens to the consistency you want. Note: It needs to be thick enough to make a thin gravy to mix with the chicken.
  3. Pour the sauce together with the shredded chicken and thoroughly mix. Set this aside.
Dough
  1. Mix the masa, garlic powder, and salt together. Add in the canola oil and mix completely. Note: This will still be very dry.
  2. Mix the hot water in 1 cup at a time. Mix by hand. It should end up as a very moldable and pliable consistency. (I think ours may have been a little wet, but it still worked...)
Assembling the Tamales
  1. Rather than trying to explain in words how to spread the masa, fill it, and roll it.  (Pictures below)
  2. Wax paper will work well as the sheet for laying over the masa. Spreading with just your fingers works very well too once you get the feel for it.
  3. I recommend that you spread the masa as thin as you can.
  4. I pulled strips from one of the husks to use as a tie to hold the fold together. This helps if you aren't completely filling your steamer.
Cooking
  1. Once you've loaded the tamales in the steamer, (opened end facing up), pour enough water in the pan to come just below the the bottom of the tamales, but not too much that the tamales are getting wet. Watch the water level so it doesn't boil away. (Not a good thing!)
  2. Steam the tamales for 1 to 1 1/2 hours checking regularly.
  3. Note: To check for doneness, remove a tamale and let it sit for 5 minutes. The masa should no longer be sticky, and it should easily pull away from the husk
Have your bowl of dough, bowl of husks (not shown), bowl of chicken, somewhere to stuff the tortillas (I used a cookie sheet), and your steamer to put them in (or I used a colander... you'll see.), and a paper towel to wipe off the ickies on your fingers. 
 
Spread your dough in the middle of your husk.

Put a spread of chicken filling in the middle.  Notice I tore a few husks to tie the tamales with. 
 
To wrap your tamale, bring the two sides of your dough together, closing in the chicken.  Then fold over that part, then the two ends.

I didn't have to tie all the tamales, just the ends that were thicker and wouldn't stay folded over.


See, my handy dandy colander filling in as a steamer.  You can see one tamale where I didn't need to tie it and the other one where I only needed to tie one end together.


All the tamales.  My husband started helping me, so it got a little sloppy....  ;)

Since I didn't have a steamer, I put a little water in the bottom of my stockpot, then put a small stainless steel bowl down to put my colander on, so the water wouldn't touch it. 

I put the colander in the stock pot and put the lid on. 
All done!!  You can see where my husband put too much chicken fillin in them and they didn't get wrapped good. 


Related Posts Plugin for WordPress, Blogger...