Showing posts with label sewing. Show all posts

December 28, 2019

My Tree Skirt Project

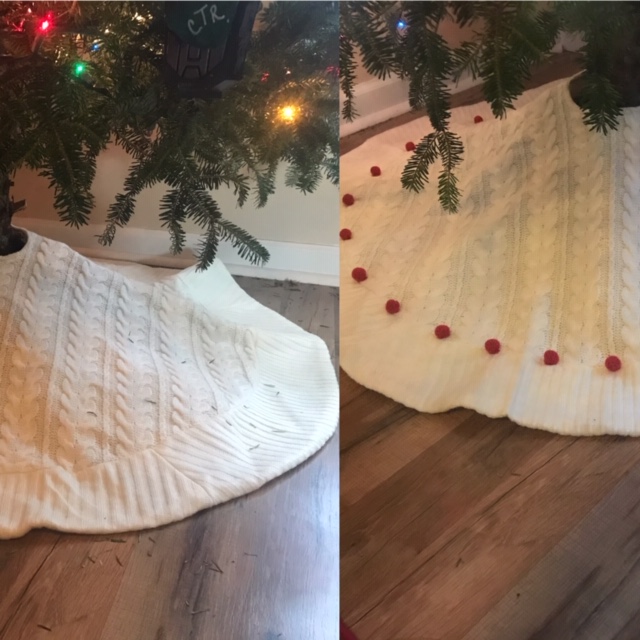
Before/After

I got a new tree skirt this year to match my stockings.  However, I just wanted to add a little bit of red to it.  I can't knit or crochet, but I really wanted some popcorn thingys on it to match my stockings.  Well, I came up with my own solution and did it yesterday! I love it so much!!


I couldn't get a complete before picture, because I was just too excited to sew on my first pom pom ball.


How I did it:

I wanted my pom poms to be the same texture as my tree skirt, so I didn't want to make poofy yarn pom poms.  I had some sleeves of a red sweater from my craft room that I used to make re-purposed stockings years ago (thankfully not in the storage unit).  They matched perfectly! All I needed was, thread, scissors, and I used those packaging pillow things as the stuffing of my pom poms.  Reduce, reuse, recycle - bonus!


I used a fourth of each square in one pom pom

I used a spool of thread for the size of my circles.

I rolled up the plastic, placed it in the middle of the circle, and stitched around the outside, then pulled the stitch closed to form my pom pom. 

Then, I sewed each pom pom on the tree skirt. 

If you can't knit or crochet, now you can make your own pom poms to add texture to a fun project!

November 20, 2015

Refashion Friday - Dressing up a Dress

My sister and I went thrift shopping at New Years and she found this dress and said I should buy it for Mallary's baptism.  It was only $2.  I almost didn't buy it because I don't really like fancy fru fru dresses, but I thought I could use it for something else if I decided not to use it for Mallary.  

Before Pictures:


The dress fit perfectly. There was a rip on one side where a sash had been.  The other side had one part of the sash still.  I cut that out carefully and made the sleeves out of the sash.  I made a pearl collar for it, and sewed on pearls to the little bow in the front.  So, it's funny because I made it more fru fru which isn't really me.  But, I think it turned out so cute.

The after picture:


So, the perfect dress for a total of $4! (I got the pearls for 50% off at Hobby Lobby)

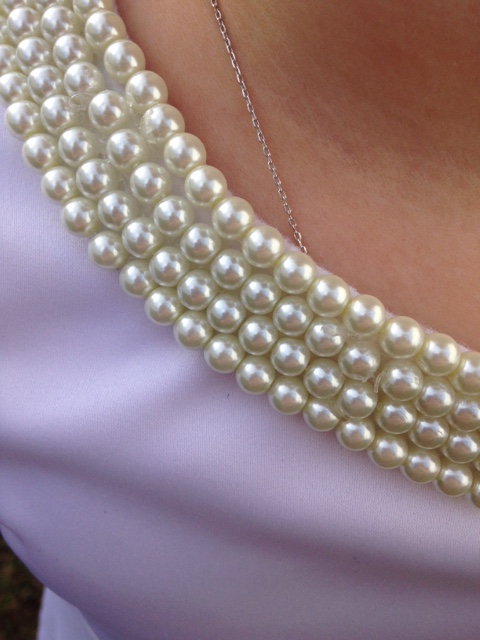
An up close shot of the collar.  You can see the fishing wire coming out of some of the pearls.

I sewed some pearls on the bow at the waist

I also made her a matching bracelet with leftover pearls.

I was kind of sloppy and did the collar pretty quickly, so you can see the first time she wore it some pearls fell off the collar as you can see in this picture. 

I cut out the size of collar I was going to use out of felt.  I clipped the pearl strand so the pearls wouldn't be loose on the fishing wire.  I glued the middle part of the collar first.

Then I glued in the last strand to the outer part of the collar.

This was the dress she was baptized in which was also a flower girl dress from my wedding 13 years ago!  My niece wore it for my wedding and then wore it to be baptized in a month later.  Most of my nieces have worn this dress to be baptized in since then.  The dress that keeps on giving.  Love it! 

July 25, 2014

Refashion Friday

I found a dress I liked and that I didn't hate on me, but it didn't have sleeves and was a little too short. The hemline of all the dresses lately are just a tad too short for my liking.  In my opinion, I think short flowy dresses look best on 20 year olds or younger. I think short dresses and short skirts look best on older women (I'm an older woman now?!?!  Haha!!) when they are tighter and more fitted.  Obviously I don't think this always applies, but mostly.  (Again, in my opinion.)

So, I bought two dresses so I could use the fabric from one and add sleeves and lengthen the hem of the other.  The dress was 50% off, so I got two dresses for the price of one!


At first, I was going to do a black solid color block to add to the hem, and didn't feel like taking the time to find the same kind of fabric, so I just bought the second dress instead.  For the hem, I had to use the fabric so the stripes went horizontal instead of vertical.  But, I liked how it turned out. 

I actually ended up hemming it a little longer than I planned on accident because after I let out the hem on the dress, I forgot that I could make a bigger seam allowance, but oh well.   I'm definitely not going to fix it to make it an inch shorter!

Also, the sleeves didn't turn out how I wanted, so I'll eventually fix them or pay someone else to fix them.  We'll see how I feel when I actually get around to it!

You can see the finished picture below.  These aren't the best family pictures, but they are the best ones that show my completed dress.   


The bonus?  I'm directing a wedding in January and the colors are black and white, so I now have a dress to wear for the wedding!  I'll just add a cardigan!  Yay!

January 10, 2014

Refashion Friday - Dresses/Blouses to Scarves!

Here's a sneak peak of what will be on my Etsy store soon! Interested in one? Just let me know!!

For some reason I didn't take any before pictures of what the clothes looked like before I started cutting them up! Oh well!!

Love this long infinity scarf made from a tunic
Made from a dress...  There are two of these, not exactly like each other though.  Love the tribal vibe...


This infinity is made from a dress - love the added ruffle detail
This scarf has already sold - but I'm hoping to find more dresses like this to make more!

The following scarves are what inspired me to start making scarves at all.  At my craft show in December, there was a lady selling scarves like this.  I loved how they were different, how you didn't have to know how to tie a scarf and that it made a giant bow!  Immediately, I thought it would be fun to make these out of other clothes!  (Imagine that...)   I wanted to borrow it so I could trace a pattern, but what crafter is going to do that - so, I had to come up with my own instead.  And, actually after my sister told me her opinion of what I was already thinking, I changed it up so I like it better than the ones the other crafter sold. 

Made from a dress... Love!!


Made from a cotton halter blouse! 


That was the first addition!  :)  The very first one I made - so you can see the difference in the others and how I changed my first pattern.  This one was made from a blouse. 


November 22, 2013

Refashion Friday - Dress Redo


So, my little sister brings bags of clothes to my house (after taking them to my older sisters house to go through to see if I want any to wear, or I want any to refashion, and then I sell the leftovers in a yard sale.  She is shorter than me - so rarely do dresses and such ever work - but they are perfect to refashion for Mallary! 

Mallary is less than thrilled to take pictures, but whenever my sister brings clothes, Mallary jumps in to say, "You could make me a dress out of this!"
My method:  First, I cut the pieces apart.  Then, I ripped out the pink seams from the elastic piece.  Next, I cut and sewed the elastic to the width I needed. Then, I took up and took in the pink top.  Then I attached everything back together!  The best part is I didn't even have to hem the bottom! I just left it a little longer - then she can wear it next year too. 


Honestly, it isn't perfect.  I didn't have much time and wanted to finish it quickly.  Let's just say I would not have gotten a very good grade in my sewing class in college on the arm hole parts!  Oh well!  It's a dress (Mallary doesn't have very many) and it was free! 


I do believe she can use this dress in any season.  Bonus!

November 15, 2013

Refashion Friday - Sweater to dress


My friend gave me some clothes for a yard sale and in the bunch of stuff was this sweater.  I thought the flower appliques were so cute (especially on the pockets!) and I got the idea to make it into a sweater dress for Mallary. When I first started my business years ago, I actually started with sweater dresses.  I made girls sweater dresses out of adult sweaters.  They were cute, I actually have two left still unsold...

It was a quick project.  My Grandma watched as I made it and said that is the fastest dress ever made!  As I told my sister, it's not something I probably would have bought had I found it in a store, but it was free!  I think it turned out pretty good!


Method:

I cut off the sleeves, shortened them, thinned them.

I sewed up the sides - a lot.

I reattached sleeves!

That's it!!

Bonus?  It will fit her next year too!

August 16, 2012

Mallary's Easter Dress

It was always a tradition to have a new Easter dress growing up, and I've carried that tradition on with Mallary.  However, this year we were trying to save our money, and I was going to be strong and fore go an Easter dress.  As silly a thing an Easter dress, I was sad about it, but was just going to get over it.  We were to leave for our Spring Break vacation the next day to Utah, and I couldn't take it anymore, and I thought I would just make Mallary an Easter dress...

I found this fabric in my stash that I had bought at least two years ago, and went to town.  I had an idea of what I wanted, but no pattern.  Who needs a pattern???  ;) 

So, I just made one up.  I only had to make the inside layer for the bodice twice, because my first attempt was too small.  A couple of hours later, I had her Easter dress! 

I made the boys matching seer sucker bow ties - see HERE

Waste not, want not - I found these buttons in my mom's handed down button stash, and I used elastic from a sheet I ripped apart a while ago.  Of course I already had the ribbon... 


I was pleased with how it turned out, and I was proud of this being only my second dress ever.  The first one I made was in my sewing class in college 15 years ago!  (and I didn't even get an A on that one...)

April 20, 2012

Refashion Friday - Seer Sucker Bow Ties

I usually buy my kids new Easter outfits every year - it's a tradition!

But, this year, I wanted to save some money, so I thought I would just make Trevan and Jonah matching bow ties.

I used an old maternity seer sucker dress of mine that has been in my refashion pile for a while...


BEFORE:

AFTER:

We were at my brothers for Easter, so I made one for my nephew too! 

 
I have bow ties in my store for sale (link on the side), or if you are interested in a seer sucker one, just let me know. 

February 3, 2012

Placemat to Throw Pillow


I'm in the process of re-decorating my living room.  Well, I'm a year into the process...  I was waiting on finding the right rug, and the right fabric for a chair, and now that I've found both, I'm on my way to getting it done! 

I got this laser cut place mat about a year and wanted to turn it into a throw pillow.  I wasn't really sure how it would turn out, and I'm still not even sure how much I like it now that it is done.  But, at least it's done...

I got a navy blue canvas/cotton and sewed the place mat on it.  That was kind of a pain...  But, there are a lot of laser cuts out there that don't have so many little pieces which would be easier to do. 

I put in a zipper (that I already had) closure (rather sloppily I might add), and stuffed in one of my old pillow forms. 

Super cheap throw pillow!

We'll see how long it actually stays in my living room, like I said, the jury is still out...

March 19, 2010

Seersucker = Spring

I was flipping through Martha's magazine and came across this ad that reminded me of a seersucker skirt with lace trim I made last year, so I thought I would whip up another one to put in my store.


See more HERE.

Related Posts Plugin for WordPress, Blogger...