Showing posts with label Copy Cat Week. Show all posts
March 11, 2015
Copy Cat Pay Day Bars
Within the past few years I really started liking Pay Day candy bars. Usually if I've skipped a meal somehow and ended up in the grocery store check out line, the Pay Day's will be a bit tempting. So, when I saw this recipe on Pinterest I figured I had to try it.
I followed the recipe (minus having the exact amount of peanuts - oops) but the filling part never hardened up. I'm thinking maybe it needed to boil like fudge? This recipe is a lot sweeter than a Pay Day bar, but it tastes super similar. It's really good, just not exactly like a Pay Day candy bar.
Recipe HERE.
Enjoy!
March 10, 2015
Copy Cat Kentucky Fried Chicken Biscuits
We haven't eaten at KFC in a looong time, but when I came across this recipe on Pinterest, I thought it would be fun to try. I mean, I think I make the best biscuits (I'm a very humble person), but I am always willing to try a new recipe! (My biscuit recipe HERE or you can see where we turned my biscuit recipe into the copy cat flaky layered biscuits HERE)
When I saw the ingredients for the recipe though, I thought I wasn't going to make them because they called for shortening and I don't cook with that. However, I remembered I bought some to make beignets recently! Score! This recipe also called for butter flavored Crisco, but I was not going to buy some of that just to make these biscuits, (Although I used to buy that to make my pie crusts, and it was very delicious...) and I just used regular butter instead in it's place.
My husband actually made these because I was busy doing other things. I supervised in a few areas, but that's it. They do taste like KFC's biscuits for sure, not EXACTLY, but same texture, and very closely the same flavor. I don't think my husband brushed them with as much butter after baking as KFC did, and honestly they probably use some kind of margarine, so that really was probably the only difference in taste. They were good, but like any devoted husband would he said he liked our biscuits better. (Just kidding, he'd totally tell me if these tasted better!)
Copy Cat Kentucky Fried Chicken Biscuit Recipe
Recipe from HERE
- 2 cups all-purpose flour (you'll need more for kneading, it was a very, very sticky dough)
- 1 1⁄2 teaspoons salt
- 1 tablespoon sugar
- 4 teaspoons baking powder
- 1⁄4 teaspoon baking soda
- 3 tablespoons vegetable shortening
- 4 teaspoons Butter Flavor Crisco (I used butter)
- 1 cup buttermilk
- Whole milk to baste biscuits with
- PREHEAT oven to 400°F.
- Combine flour, salt, sugar, baking powder and baking soda in a large mixing bowl; Cut in shortenings until mixture resembles coarse crumbs.
- Stir in 1 cup buttermilk just until a soft dough forms (dough will be very loose and sticky at this point).
- Sprinkle flour over a large wooden board; turn dough onto a floured board and knead gently 10 to 12 times or until no longer sticky, re-flouring board as necessary while kneading.
- Gently pat or roll dough into a circle 1/2-inch thick.
- Cut out biscuits – pressing straight down – with a 2-inch biscuit cutter.
- Reform scraps, working it as little as possible and continue cutting.
- Place cut biscuits on an ungreased baking sheet with edges barely touching; brush tops of the biscuits with whole milk.
- Bake for 15 minutes, or until golden brown.
- Immediately brush biscuits with butter after baking.
- Serve hot and enjoy!
| What they looked like after basting with milk |
March 9, 2015
Copy Cat Zupas Cauliflower Soup
It's Copy Cat Week!! Yay!!!!
You know that one of my favorite things is to get recipes from my favorite dishes at restaurants and make them at home! I've gotten requests to find recipes of foods I haven't eaten and that's fun too! If someone else talks about how good a dish is at a restaurant I am more than happy in finding a copy cat recipe and trying it. Like this one!!!
I have never eaten at Zupas, however, I have heard so many people rave about this soup, so I had to try it!
I found this recipe on Pinterest, and it claimed to be identical. I have no idea if it was, but it was creamy and delicious! So delicious that I made it twice within one week! I told my kids that it was like potato soup, and they ate it! Even after I told them it was made with cauliflower!
It was a great meal for our snowy cold days. Also, a relatively nutritious meal you can feed your family for under $10 and have some leftover for your husband to take in his lunch the next day (if you don't claim it yourself!)
Seriously, it was sooo delicious. I encourage topping it with the cheese, bacon, and onions - so good!!!
Copy Cat Zupas Cauliflower Soup
Recipe from HERE
- 1 medium onion, chopped
- 3 T butter
- 2 pounds cauliflower, chopped into 1 inch pieces
- ¼ C flour
- 2 C half and half
- 1½ cup water
- 1 14½ ounce can chicken broth
- 1½ C sharp cheddar cheese, shredded
- ½ C pepper jack cheese, shredded
- ½ tsp salt
- 1 tsp dijon mustard
- Optional Toppings:
- Green Onions
- Bacon Bits
- Additional Cheese
Instructions
- In a large pot, melt 3 T butter and cook the chopped onion until translucent and golden brown. Whisk in the flour. Gradually stir in half and half, water and chicken broth.
- Add the chopped cauliflower and heat to boiling. Reduce heat to medium low and allow the cauliflower to cook until tender about 15 minutes.
- In a blender with the center of the top removed to allow steam to escape, blend the soup in batches until smooth. Return to the pot. (Instead of using a blender I use my immersion blender - much easier!)
- Heat soup to medium heat and add in dijon mustard and cheese and stir until melted. Serve with optional toppings. (I just take my soup off the heat, use the immersion blender, then add the cheese and mustard without putting it back on the heat.)
- Enjoy!
December 13, 2013
Refashion Friday - Copy Cat Bead Kit
My six year old daughter asks me if she can play with the beads in my workroom at least four times a week. I was thinking about getting her one of those bead kits for Christmas, but we've spent enough money already, and then I had a thought, "why not just make one???"
So, I did! I already had a bead container to use, I cut up some old jewelry, and went through the beads I already have.
She is going to love this! She won't have to ask me to do beads anymore, she will have her own!
I took apart some of my old jewelry...
So, I did! I already had a bead container to use, I cut up some old jewelry, and went through the beads I already have.
She is going to love this! She won't have to ask me to do beads anymore, she will have her own!
| Since this picture was taken, I added some stretchy bead cording, and more beads for a grand total of $2.50! |
I took apart some of my old jewelry...
| I went through the beads I have and picked out the ones to add to her box. Now, no one can say I don't throw anything away, because this pile totally went in the trash! |
December 12, 2013
Copy Cat Spaghettios
When I had the thought to make this, I didn't start out thinking, "I'm going to make my own spaghettios." I made my tortellini soup for dinner and my kids would not eat it. I had even made it this time and pureed all the vegetables so they would eat it! For some reason, they wouldn't eat it with just the sausage in it! They love sausage, but they wouldn't eat it. So, the next day, I had the thought to drain out the sausage and add some mini star pasta that I had on hand, and this recipe was born.
I buy Spaghettios a few times a year, so not very much, but Mallary will eat them which makes no sense to me because I think they even smell horrible. Not anymore! The kids LOVED this. I had packed it in their lunch, and Trevan came home and said, "When did you buy those Spaghettios??!" Ha! He told me it was so good!! The SAME soup they wouldn't eat the day before, but you add star noodles and life is all good again. It's a win win - they are eating a TON of vegetables and don't even know it!
Copy Cat Spaghettios Recipe
1 cup chopped onion
1/2 cup diced celery (about 2 stalks)
2 cloves garlic, minced6 cups beef broth (3 -14oz. cans)
1 cup water
1 1/2 cup sliced carrots2. While pasta is cooking, saute onion, celery and garlic in a little bit of olive oil in a large pot and cook until tender. (Honestly, I will probably cook sausage, remove it from pan then saute the onion, etc. in that sausage grease to add that flavor to the soup. Then I'd just use the sausage in another recipe.) Add broth, water, carrots, tomatoes, basil, oregano, parsley. Bring to a boil for 15 minutes.
3. Add squash and zucchini. Cover and cook until squash and zucchini are tender.
4. Puree vegetables. Then add cooked pasta.
5. Serve up the yummy goodness to your kids (and you)!
| I mean, look at all those veggies! Your kids don't even know it!! Yum! |
December 11, 2013
Copy Cat Wendy's Frosty - Take 2
I like my copy cat Wendy's Frosty recipe, but I'm never opposed to trying another!!
I found this recipe on Pinterest, and it was super easy, and pretty close to the real thing... I almost didn't try it because it had Cool Whip in it, but I checked the food snob at the kitchen door that day. :) But, I may try this recipe using whipping cream next time. To quote my mom, "Why use something that has so many ingredients, when cream is just one ingredient?" Ha! Though, the Cool Whip may be key in this recipe because I think it helps make the little granule things that Wendy's frostys have...
Remember, your chocolate milk is the star of this show, so make sure you are using a kind that you know tastes good!
Copy Cat Wendy's Frosty Recipe - Take 2
Recipe from HERE
1 can sweetened condensed milk
1 8 oz. tub Cool Whip
1/2 gallon chocolate milk
Mix ingredients together and put in your ice cream maker for about 30 minutes.
*This makes more than you can put in one of the smaller standard electric ice cream makers. Even though we have two of them, I didn't have the container frozen for the other one. So, I just kept the liquid in a bowl covered in the fridge and made some the next day too!
December 10, 2013
Copy Cat Snow Globe - Tutorial
I've seen the snow globes that you can make out of a mason jar, but I had never seen them like this until I saw it on a friend's Instagram widget on her blog that she took at some festival or something. Immediately I knew we would be making these for family night, and we did! (Trust me, our family home evening nights are NEVER this involved!)
I knew my kids would enjoy shopping for and picking out their little figures. I had to reign in my nine year old son because he wanted to put everything and the kitchen sink in his. He had to have birds in his trees even though they weren't going to be "to scale." They really enjoyed it, and fought over the snow in the store, of course!
This is a cheap project if you have bowls/containers already lying around your house!
I love that each globe represents each of my kids so well...
| I realized this morning that this is so appropriate for my six year old daughter - always picking on her brothers (everyone)! |
| This represents my nine year old, happy go lucky! |
Snow Globe Tutorial
Fish bowl (or any clear container - could be plastic for the little ones)
Snow
Foam board
Hot glue gun (and glue sticks!)
Little figurines and trees (Now is a good time to get them - they are 60%, but slim pickings!)
Puffy Paint (I wasn't sure they even made this anymore, but they do!)
1. Trace the opening of your container - then cut it out inside the line a bit. You kind of have to play with this.
2. Glue your figures to the foam board.
3. Put a pile of snow in the middle of your foam board, kind of piled up in the center.
4. Put hot glue around the rim of your container.
5. This picture is kind of misleading because first I actually put the bowl on top of the foam board while the foam board is on the counter and press to make a seal, then if I have to adjust any I pick it up and do so. That's what the picture shows below. I use hot glue to seal up any cracks in between the foam board and the container.
6. Then, I put the puffy paint (snow) around the bottom and any foam board still visible.
7. Leave upside down to dry.
8. Three drying snow globes!
9. After dried, shake and enjoy!
** I wasn't sure I was going to like this snow once I opened it, but I like how some sticks to the container making it look like it is always flurrying inside!! Love!
December 9, 2013
Copy Cat Flaky Layers Biscuits
My grandparents lived a couple miles away from each other. When we went to visit our Grandparents, we visited both sets of grandparents. My Grandma made her biscuits from scratch, which I loved... My Grandmommy made the flaky layers biscuits out of one of those cans, which I also loved.
I've been toying with the idea of trying to make some flaky biscuits from my own biscuit recipe, and I finally tried it, and we LOVED them! So fun, so soft and so flaky! My six year old said, "These are the fluffiest biscuits you ever made!"
I used my recipe HERE, and then did the following...
(For the record I was working with a doubled batch of biscuit dough here...)
First, make sure your dough is not too sticky. Your dough should be kneaded together, add flour and knead more until it isn't too sticky. Divide your dough into five balls. Roll out each ball pretty thin. You'll need some extra flour to work with to sprinkle down on the mat and your dough with each layer.
Once rolled out, I put each layer on top of each other piled on a plate.
After rolling out each ball. I cut a fourth of the dough to work with at a time. (Because I was too lazy to wash a working space, I just used a cutting mat! So you can take the whole pile and do at one time which would really be easier!)
Take the section (see the five layers above) and roll it out a little bit with a rolling pin smashing the layers together. Then fold that in half creating 10 layers. (Below)
Roll that to the desired thickness and cut out your biscuits.
| Look at the layers!! |
Bake at the normal temperature - they are a bit thicker, so it may take a little bit longer to cook.
Loved how they turned out!!!
August 31, 2013
Sinful Saturday...Copy Cat Snickers Bar
I just decided to have a Sinful Saturday theme on my blog. I'll post new desserts or feature old ones like today. I'll be posting only the most insanely delicious items that make you gain 10 pounds just by looking at them, and items that you just CAN'T. STOP. EATING.
I'm sorry. And, you're welcome.
From March 2012
Oh. My. Goodness. This recipe is sooooo good! We liked the twix bars, but we think this recipe is way better. So good! I'd choose these over a regular old Snickers bar any day!!
This is a great recipe, and I only made two minor changes to the recipe. 1- this recipe combined the nougat and the nuts, but in a real Snickers bar they are layered, so I layered them. 2 - The caramel calls for whipping cream, but I just used the evaporated milk that was already open from this recipe instead of buying another ingredient. It turned out great!!
This recipe does take a little time to make, having to wait for the layers to cool. But, you could make the first part one morning, the next part in the evening, and the other part the next day, so you aren't tied to the kitchen if you don't have the time.
Copy Cat Snickers Bar Recipe:
Adapted from HERE
For the Bottom Chocolate Layer:
1¼ cups milk chocolate chips
¼ cup creamy peanut butter
1. Grease a 9×13-inch baking pan. Line with parchment paper (I used aluminum foil), then grease the parchment paper; set aside.
2. Make the Bottom Chocolate Layer: Melt together the chocolate chips and peanut butter in the microwave until completely smooth and melted, stirring every 30 seconds. Pour into the prepared baking dish and, using a spatula, smooth into an even layer. Refrigerate until completely cool and hard, about 30 minutes.
For the Nougat Layer:
4 tablespoons unsalted butter
1 cup granulated sugar
¼ cup evaporated milk
1½ cups marshmallow fluff
¼ cup creamy peanut butter
1 teaspoon vanilla extract
1½ cups salted peanuts, roughly chopped
3. Make the Nougat Layer: Melt the butter in a medium saucepan over medium heat. Add the sugar and evaporated milk, stirring until dissolved, and bring to a boil. Reduce the heat to low and cook for 5 minutes, stirring occasionally. Remove the pan from heat and add the marshmallow fluff, peanut butter, and vanilla extract, stirring until completely smooth. Pour over the bottom chocolate layer.
4. Pour chopped peanuts over nougat. Again, refrigerate until completely cool, about 30 minutes.
For the Caramel Layer:
14 ounces caramels, unwrapped
¼ cup evaporated milk
5. Make the Caramel Layer: Combine the caramels and the evaporated milk in a small saucepan over low heat. Melt, stirring occasionally, until smooth. Once completely melted, cook for an additional minute or two, stirring frequently. Pour the caramel over the nougat layer. Refrigerate until completely cool, about 30 minutes.
For the Top Chocolate Layer:
1¼ cups milk chocolate chips
¼ cup creamy peanut butter
6. Make the Top Chocolate Layer: Melt together the chocolate chips and peanut butter in the microwave until completely smooth and melted, stirring every 30 seconds. Pour over the caramel layer and, using a spatula, smooth into an even layer. Refrigerate until completely cool and set, 30 to 60 minutes.
7. Using the parchment liner, remove the bars from the pan and cut into 32 pieces. You can store these in the refrigerator or at room temperature. The filling is yummiest at room temperature, but the chocolate can get a little melty especially if it is warm. They are yummy straight out of the fridge too!!!
8. Enjoy!
See you at the gym... :)
August 19, 2013
My attempt at making CRONUTS!
Surely, you have heard of cronuts by now... However, I won't be making it to NYC to try one anytime soon, so of course I had to try to make my own. Cronuts are a cross between a doughnut and a croissant.
I read quite a bit about them and researched some different recipes. I found this one from G Bakes! that I decided to try, and if you are going to try to make them yourself, go to her blog and follow her recipe and directions! I just like to have the recipes I try here on my blog, but she puts
great directions and photos on hers, that you really can't make them
without seeing those. I love that her recipe came from her mother's recipe box. It was an old recipe, and obviously cronuts have been around for a while, just that they weren't called cronuts.
Mine tasted great, they had layers, but they weren't as tall as normal cronuts look.... I have a couple of things I'll do different next time...
1. My dough needed to be a bit firmer.
2. I crushed the layers after they rose by not using an actual doughnut cutter. My cutter wasn't tall enough, so with each cut I was cramming the layers together I think.
2. I needed to wait until the cronuts were completely cool to add the glaze. The glaze could be a bit thicker too.
3. I could not get my oil to the right temperature!!! It was a little bit insane!
| you can see the layers... the smaller one did better being taller. |
| You can see where I put the pastry cream in! The pastry cream recipe was spot on, and I plan on using it for other things.... |
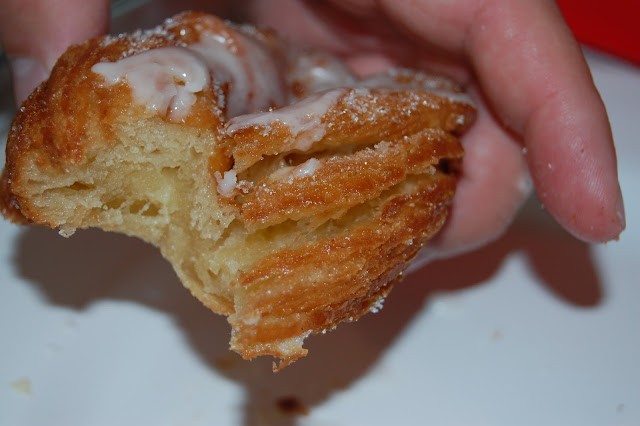
| You can see some of my flaky layers... |
Recipe from HERE
for the dough
1/2 cup water
1/2 cup whole milk
2 eggs
1 tablespoon vanilla bean paste (I used vanilla extract)
4 cups All Purpose Flour plus a cup extra for rolling
1/2 cup sugar
One 1/4 ounce package instant yeast
1 teaspoon salt
1 tablespoon unsalted butter, room temperature
for the butter block
1 pound plus 2 tablespoons unsalted European butter, slightly cooler than room temperature
1/4 cup all purpose flour
For the Cronuts
1 dough
2 quarts, grapeseed oil
1 batch pastry cream:
1/2 cup heavy cream
1/2 cup milk
1/4 cup sugar
3 egg yolks
pinch salt
2 1/2 tablespoons cornstarch
1 teaspoon vanilla bean paste (I used vanilla extract)
To finish the Cronuts:
1/2 cup granulated sugarGlaze
1 cup confectioner's sugar
2 tablespoons whole milk
1. In the bowl of a stand mixer, whisk together the water, milk, eggs and vanilla bean paste until smooth, making sure that the egg yolks are completely incorporated into the mixture.
2. In another bowl, stir together the flour, sugar, instant yeast and salt. Add to the wet ingredients in the mixing bowl and attach the dough hook.
3. On slow speed, mix the dough for 5 minutes until smooth. Add the butter, a few bits at a time. Continue mixing until the dough pulls away from the sides of the bowl and is smooth and shiny, about 5 more minutes. Turn the dough out onto plastic wrap and cover completely. Refrigerate for 20 minutes. In the meantime, make the butter block.
4. Fold a piece of parchment, the size of a half sheet pan, in half. Set aside.
5. Cut the butter into small pieces. Combine the butter and flour in the bowl of a stand mixer fit with a paddle attachment. Mix on slow until the butter is smooth.
6. Transfer the smooth butter mixture to one half of the parchment. Fold the other half of the parchment over. Roll the butter into a 8" x 12" rectangle between the parchment. Cut the butter in half so you have two pieces of butter, both measuring 6" x 8". Cover both pieces with plastic wrap and refrigerate for 5 minutes.
7. Remove the dough from the fridge and turn out onto a lightly floured surface. Roll into a 9" x 18" rectangle. Place one piece of 6" x 8" dough across the center of the dough and lift the left piece of dough up and over the butter, sealing the edges with your fingers. Place the other sheet of butter on top and bring the other half of dough over that, again sealing the butter in. Wrap in plastic wrap and chill for 20 minutes.
8. Turn the dough out onto a lightly floured surface. Roll the dough into an 8" x 18" strip. Fold both narrow ends in to meet at the center,
9. Then fold, in half, making 4 layers. Wrap in plastic wrap and chill for 20 minutes. Repeat this procedure one more time. Cover and chill for 20 minutes and then roll into an 8" x 18" rectangle and simply fold in half. Wrap in plastic and chill in the fridge for at least 2 hours.
Make the pastry cream:
10. Whisk yolks, sugar, salt, cornstarch and vanilla bean paste in the bowl of an electric mixer until light and fluffy.
11.
Simmer cream and milk in a heavy saucepan and slowly pour the hot cream
into whisking sugar/yolk mixture until well combined.
12. Transfer back to the saucepan and whisk over medium heat until thickened.
13. Place in a
bowl and cover the top of the cream with plastic wrap to prevent a skin
from forming. Refrigerate until completely cool. You can add many
flavors at this point, including orange blossom or rose oil.
Fry the cronuts:
15. In a large stock pot, heat the oil to 350º to 360º F. Carefully place the donuts (and the holes) in the oil. Allow the donuts to fry on one side for 45 - 60 seconds, until deeply golden brown. Using chopsticks, flip the donuts and fry for a minute more, until both sides are deeply golden brown and they donuts have expanded considerably. The holes take less than half that time. Place the donuts on a piece of paper towel to drain and cool.
16. Once the
donuts are cool, coat the outside of the donuts (and holes) with the
granulated sugar. Place the cooled pastry cream in a pastry bag fit
with a small open tip. I find open spaces in the center of the donut
holes and wiggle the tip inside and squeeze in the cream.
17. For the
glaze, place the confectioner's sugar in a bowl and stir in 1 tablespoon
of milk. If the glaze is too thick, add a drop of milk at a time until
the glaze is spreadable. Drizzle on top of the donuts.
18. ENJOY!!!!!
April 11, 2013
Copy Cat Hawaiian Rolls
Wow, you guys! This is a good recipe! As I started making it, I became a bit skeptical that these were actually going to turn out. I persevered and stuck to the instructions... :) And, they came out beautifully. (Though, a little brown on the top... I got distracted... Imagine that with four kids!!)
These taste like the ones you buy in the store, except better because they taste fresh and home made! They taste like the bread I had in Hawaii. It makes sense that Hawaiian bread has pineapple juice in it! I don't know why I never figured that out before!! Enjoy!
Copy Cat Hawaiian Rolls Recipe
Recipe from HERE
- 6 cups all-purpose flour, plus an additional 1/2 cup flour, divided
- 3 eggs
- 2 cups pineapple juice
- 3/4 cup sugar
- 1/2 teaspoon ginger
- 1 teaspoon vanilla
- 2 (1/4 ounce) envelopes yeast
- 1/2 cup (8 tablespoons) butter, melted
Instructions
- In a small bowl, beat your 3 eggs. Add the 2 cups pineapple juice, sugar, ginger, vanilla, and melted butter.
- Measure 3 cups of the flour into a large bowl. Stir in your egg mixture until well-combined. Sprinkle in the yeast packets, one at a time, mixing well.
- Add the remaining 3 cups of flour and mix well. If it becomes to difficult to stir with a wooden spoon, just use your hands! Make sure all of the flour is well incorporated—the dough should be tacky to the touch but not overly sticky. If it appears too wet, sprinkle in a bit of extra flour, just a tablespoon or so at a time. Cover your bowl with a clean kitchen towel and set it in a warm place to rise for 1 hour. (For the record, my dough never rose during this step...and I didn't have time to wait and see if it would...)
- Remove your dough from the bowl and knead in an additional ½ cup of flour. I kneaded mine 10 to 15 times, making sure the flour was well incorporated.
- Divide the dough into three equal parts. You may either bake 3 loaves of bread, form the dough into rolls, or a combination of the two. I baked one loaf of bread, forming the remaining dough into 15 rolls and baking in a 9x13 pan. Cover and place in warm place to rise for an additional hour, or until the dough doubles in size. (I made 30 rolls in 2 different sized pans. I rolled balls of dough in my hands and put them almost touching in the pan.)
- Bake at 350 degrees for 25 to 30 minutes, or until golden brown. (Mine would have been done at 20 minutes) Brush tops with melted butter, and serve warm.
April 10, 2013
Copy Cat Red Robin Onion Rings
Whenever I eat onion rings I think back to when I was a kid, my dad would make onion rings sometimes on Sunday evenings as a treat!
I was impressed with this recipe. I've made a lot of onion rings that don't stay coated as well like these did.
I had already started making the onion rings when I pulled out my Panko bread crumbs and they were Italian seasoned! Oh well, I made them anyway and they still turned out, just next time I'll make them without the Italian seasoned bread crumbs.
I did change up a few things with this recipe, because it wasn't working. I added a step in #4 below. Also, in step #3 it tells you to put a teaspoon of the salt mixture in each bowl, but then you have all this seasoning left over. I just distributed it evenly in all three bowls. Also, next time I will put the Panko breadcrumbs in the food processor before coating the onions, because I think they need to be finer.
The campfire sauce tasted the same as Red Robin's. My husband thought it should be a little thinner, so next time we'll add a drop of ranch dressing to it as well.
Copy Cat Red Robin Onion Rings Recipe
Recipe from HERE
1 tbsp. fine sea salt
1 tbsp. freshly ground black pepper
1 tbsp. paprika
1 tbsp. granulated garlic
1 tbsp. sugar
4 large sweet onions, peeled and sliced into ¾-in. slices
2 cups all-purpose flour
¼ cup cornmeal
6 large eggs
¼ cup water
5 cups panko bread crumbs (put in food processor to make a finer consistency)
6-8 cups canola oil (I used peanut oil)
Campfire Sauce
1. Combine sea salt and next 4 ingredients; set aside.
2. Separate onions into rings.
3. Set aside 3 large shallow bowls. Combine flour, cornmeal and 1 tsp. salt mixture in first bowl. Whisk eggs and water in second. Mix panko and 1 tsp. salt mixture in third.
4. Dredge each ring in flour mixture, then egg mixture. Dip ring into flour mixture again, then back in egg mixture then in panko mixture, pressing crumbs onto rings to ensure even coating. Place on parchment-lined baking sheet. Repeat with remaining onions. Cover loosely; chill 30 min.
5. Heat oil to 350 in a large deep skillet or electric fryer (use fry thermometer to ensure oil is not too hot). Fry rings in batches, allowing oil to return to 350 between batches. Place cooked onions on paper-towel-lined baking sheet. Serve with Campfire Sauce.
CAMPFIRE SAUCE
Whisk 1½ cups mayonnaise and 1 cup prepared barbecue sauce in medium bowl; cover and chill at least 1 hour.
April 9, 2013
Copy Cat Boston Market Cornbread
For the record, don't make muffins unless you have cupcake wrappers, or flour or muffin tins after greasing them. They were close to impossible to get out. These are probably the only three that came out whole.
They were good. Sweet like they serve at Boston Market, but you'll see why when you look at the ingredients. I don't often buy Jiffy box mixes, so realistically I probably won't make this recipe again. They were good though....
I used the first combination of the one cornbread and yellow cake mix.
Copy Cat Boston Market Cornbread Recipe
Recipe from HERE
-
1 box Jiffy Mix Cornbread Mix
-
1 box Jiffy Mix Yellow Cake Mix
OR -
2 boxes Jiffy Mix Cornbread Mix
-
1 box regular yellow cake mix
Directions: Mix both boxes according to directions, and
combine the batter. You can use a large mixing bowl and combine both boxes of mix together
and add the other ingredients all at once. If you have only boxes of Jiffy Mix,
use a brownie sized
baking pan, 8x8", if you are using a box of regular cake mix, use a 9x13" pan.
Spray pan with cooking spray. Bake at 350 degrees until done, approx. 30
minutes. Test for doneness: insert a toothpick, it should come
out clean.
Notes from the blogger where I found the recipe: Please note from the comments: "If you can't
find the Jiffy yellow cake mix, only use Duncan Hines, Butter Golden cake
mix...It's the only one WITHOUT pudding in the mix." I have made it with
regular yellow cake mix and I liked it, but it may be too 'cakey' for some...if
so...try the Duncan Hines, Butter Golden cake mix
April 8, 2013
Copy Cat PF Changs Lettuce Wraps
I don't think these tasted exactly like the lettuce wraps that they serve at P.F. Chang's, they definitely don't look like them, and we didn't have the little noodles, but they were really tasty!! John really loved them, and really it's a pretty healthy dish.
The food processor should be your friend if you are going to make this. I diced everything using the food processor. After I cooked the chicken, I put it in the food processor too instead of dicing it into small pieces.
Copy Cat P.F. Chang's Lettuce Wrap Recipe
Recipe from HERE
3 tablespoons oil
2 boneless skinless chicken breasts
1 cup
water chestnut
2/3 cup
mushroom
3 tablespoons chopped onions
1 teaspoon
minced garlic
4 -5 leaves iceberg lettuce
Special Sauce:
1/4 cup
sugar
1/2 cup
water + 2 tsp.
2 tablespoons soy sauce
2 tablespoons rice wine vinegar
2 tablespoons ketchup
1 tablespoon lemon
juice
1/8 teaspoon sesame oil
1 tablespoon spicy mustard
1 -2 teaspoon garlic and red chile paste
Stir Fry Sauce:
2 tablespoons soy sauce
2 tablespoons brown sugar
1/2 teaspoon rice wine vinegar
1. Make the special sauce by
dissolving the sugar in water in a small bowl and adding other ingredients. Put in refrigerator until ready to serve.
2. Bring oil to high heat in a wok
or large frying pan. Saute chicken breasts for 4 to 5 minutes per side or done.
Remove chicken from the pan and cool. Keep oil in the pan, keep hot.
3. Mince water chestnuts, mushrooms, onions to about the size of small peas.
4. Prepare the stir fry sauce by mixing the soy sauce, brown sugar, and rice
vinegar together in a small bowl. I actually ended up adding another tablespoon of the soy sauce, brown sugar, and 1/4 tsp. of the rice vinegar because I think the chicken breasts I used were huge and it was a little dry.
5. When chicken is cool, mince it to the same
size as mushrooms and water chestnuts.
6. With the pan still on medium high
heat, add another Tbsp of oil. Add chicken, garlic, onions, water
chestnuts and mushrooms to the pan. Add the stir fry sauce to the pan and saute
the mixture for a couple minutes then serve it in the lettuce"cups". Top with
Special Sauce.
April 7, 2013
Copy Cat Mimi's Carrot Raisin Bread
John and I love eating out and trying new restaurants, however now that our children all eat big people portions, eating out is really expensive, so we don't do it anymore. It's really sad. But, I get over it by just finding our favorite recipes and making them at home! So, we get good food for way less money! Perfect!
My favorite food that Mimi's Cafe serves is the carrot raisin bread that is in the bread basket they give you. I like to order a whole loaf if I go at lunch or breakfast when they don't give you the bread basket. Why have I never looked this recipe up before now?!?!?!!?
This is a really great and yummy recipe! It does taste like the bread Mimi's serves, even more so the day after. So, bake it then eat it the next day for the more authentic Mimi's taste. I didn't add the walnuts. I don't mind them at the restaurant, but that's the perks to making the recipes at home, you can leave your not so favorites out!
Copy Cat Mimi's Carrot Raisin Bread Recipe
Recipe from HERE
1 1/2 c | flour |
| 1 tsp | baking soda |
| 2 tsp | baking powder |
| 2 tsp | cinnamon |
| 1/2 tsp | salt |
| 1 c | vegetable oil |
| 1 1/2 c | brown sugar |
| 3 | eggs |
| 1/2 c | chopped walnuts (I didn't add) |
| 1/2 c | crushed pineapple, drained |
| 1/2 c | raisins |
| 1 c | finely shredded carrot |
1. Preheat oven to 350 degrees.
2. Grease and flour 2 regular sized bread loaf pans.
3. In a medium bowl; sift together first five ingredients; set aside.
4. In a separate bowl; whisk together oil, brown sugar and eggs; pour into flour mixture and stir well.
5. Stir in walnuts, pineapple, raisins and carrots.
6. Pour into prepare pan(s). Bake 30 to 40 minutes until lightly browned. Test with toothpick or cake tester to make sure it's done.
*** I didn't do any sifting. I dumped all the ingredients together in the Kitchen Aid, and added the carrots, pineapple, and raisins last.
Subscribe to:
Posts (Atom)
