Showing posts with label Home decor. Show all posts

February 3, 2012

Placemat to Throw Pillow


I'm in the process of re-decorating my living room.  Well, I'm a year into the process...  I was waiting on finding the right rug, and the right fabric for a chair, and now that I've found both, I'm on my way to getting it done! 

I got this laser cut place mat about a year and wanted to turn it into a throw pillow.  I wasn't really sure how it would turn out, and I'm still not even sure how much I like it now that it is done.  But, at least it's done...

I got a navy blue canvas/cotton and sewed the place mat on it.  That was kind of a pain...  But, there are a lot of laser cuts out there that don't have so many little pieces which would be easier to do. 

I put in a zipper (that I already had) closure (rather sloppily I might add), and stuffed in one of my old pillow forms. 

Super cheap throw pillow!

We'll see how long it actually stays in my living room, like I said, the jury is still out...

January 18, 2011

Valentine Mail Pouch Tutorial


I have wanted to make these since last year when I spotted them on my friend's sister-in-law's blog. She has a bunch of cute ideas - I love her hand made Valentine's Decorations. See her pouch and decor HERE.

I'm planning to make February a month of love at my house, and will make a mail pouch for every member of my family. I will leave a little something in every one's pouches every day, and will encourage the rest of my family to do the same. I hope this will help my kids focus on doing something nice for each other and us, rather than fighting over toys!!

I don't really have the patience to make tutorials, but since I had to make a template for myself, I thought I might as well share. I hope you don't mind my ghetto looking tutorial! :)


To make six Valentine Mail Pouches you'll need:

Card stock to make your template
Red Felt - Enough to make six hearts
White Felt - 1 1/2 yards
Embroidery Floss for the names (I used black, but I almost wish I used white, and then outlined my envelope with red thread...)
Ribbon - For each pouch you'll need two pieces about 47 inches long (but you could use felt and velcro for the straps as well)

I used a sewing machine on this, but really you could get away with just using hot glue...

First you need to measure the backs of the chairs you plan to put the envelopes on, and decide how big you want your envelopes to be. My chairs are pretty standard, and I decided to use a piece of 8 1/2 x 11 paper for my template.

Let's begin!

1. Start with three pieces of card stock and label them with a number 1, 2, and 3.


2. Your #1 piece is one whole piece of card stock - that is the back of your envelope. Here are the measurements for the envelope flap, #2:


3. The measurements of the pocket, #3:


4. Cut along the black lines to have your finished template.


5. You can use the discarded piece of your #2 to make your heart template:


Fold over one side, draw the sized heart you want and cut it out.


You just want to make sure your heart fits how you want it on top of your envelope piece (#2).


6. Trace your heart template on a folded piece of red felt and cut out your hearts.


7. Write the names on the hearts and embroider them. (I just roughly stitched mine, nothing fancy)


8. Next, trace all of your pouch template pieces onto white felt and cut out all of your white pieces.

9. Start with your envelope piece (#2), and pin your heart where you want it to go, and stitch around the heart, and the sides and bottom of your envelope flap. (Make sure you take note of the distance from your needle so your envelope borders can all be the same.)


Don't do the top - you make that seam when you are completing the envelope.


10. Take your #3 piece and find the middle (5.5 inches in across, and 3 inches down), and make a mark. Take your ruler from both corners to the middle and draw the lines that you will stitch over.

11. Stitch over those lines on piece #3. (Notice I don't go all the way to the corners, so they'll match up with all of the seams.)


12. Now cut your ribbon: You'll need two pieces both 47 inches long. Seal the cut pieces of your ribbon over a candle flame to prevent fraying. You'll need to figure out how your ribbon will fit on your envelope, by seeing how long of ribbon you'll need on each side to hang over your chair. I left 13 inches of ribbon on one side from the bottom, and 25 1/2 inches from the top of the envelope. Place your ribbon 1 1/4 inches from the edges of your envelope (piece #1) and pin. Do both sides.


13. Sew up both sides of both ribbons - 4 seams. Leave the tops and bottoms un-stitched, those will be stitched when finishing the envelope.


14. Place your #3 piece on top of the back of the envelope (#1), and pin. Then stitch around it. It is the bottom piece. (Please ignore my bobbin malfunction in the top right of the picture below - I was too lazy to fix it, plus no one will see it...)


15. Now put on your envelope flap piece #3. Pin and ONLY stitch the top seam connecting it to the back of the envelope (piece #1).


See how it opens? I didn't put the bottom piece all the way to the top because I wanted to leave space there so my kids didn't have to dig so much to get anything out of the pouch.

You're all done!!! Tie on your chair and enjoy!!!


Hopefully, that made sense!

I'm so excited to use these - you have no idea!!!

May 17, 2010

Nursery Makeover

Here is our nursery makeover from baby girl to baby boy:

When we had our first baby, we bought all cheap furniture because that's all we could afford, and we are still using it! Why get rid of something that works? Trevan's (our first baby) room was green. When we had Mallary, I decided to reuse all the green stuff I had, and just add pink. This bedroom is the smallest bedroom in our home, and we cram a lot into a little space! I never fully finished decorating the girl nursery how I wanted. Here it was:


I found a king sized quilt I liked, and made it into a crib sized quilt. I also made a matching bumper, but that was taken down at the time they tell you to take down bumpers (whenever that is... when your baby starts pulling themselves up???).


I also made a matching pillow for the leather recliner. (The only non-cheap furniture in this room. It was in our living room almost six years ago, and this is the only room it "fits" in now.)

I wanted add more green in my room, and dress up my basic curtains, so I added the green flowers.
The mobile - a birthday present to myself from Pottery Barn two years ago.


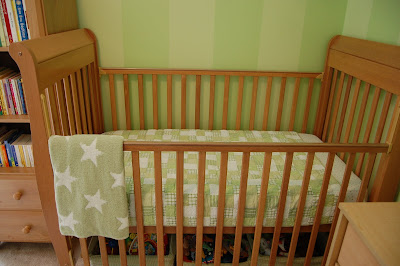
When I found out I was having another boy, I knew I would reuse the bedding I had when Trevan was a baby. We were going back to green.


I've decided to name all the rooms in my house, like they do in the White House or in Bed and Breakfasts, so the nursery is now the Green Room.


We started the makeover by painting over the pink stripe with a different shade of green.


I had to replace the butterfly mobile and couldn't find anything I liked, so I decided to make my own. I made it out of my fabric scraps, iron on stuff (I'm so technical), and embroidery hoops I painted. I love how it turned out.


I made a pillow cover out of the valance that hung in the nursery when Trevan was a baby for the old pillow that was there. I made a mommy and baby owl out of fabric scraps and ironed them on as well.


I covered wooden letters with scrapbook paper I had on hand as well. This is not a project for the OCD, I just couldn't get the paper perfect, but you can't tell from here. :)


I added sweet pictures of my baby.


and some art from Etsy.

Every new baby needs a piggy bank; of course I got one in green.


I made some dino sillouettes.


To complete the room I painted some wooden stars that have hangy things on them (technial wordage, once again) for towels and hats.


Related Posts Plugin for WordPress, Blogger...